Showing posts with label Recipe. Show all posts

11.09.2011

Sushi (a tutorial)

I hearby forbid anyone to say "I hate sushi."

No! Don't say it, don't THINK it!!

......you did that on purpose didn't you. Rude.

I am thoroughly convinced that unless you are allergic to rice there is a sushi out there that ANYONE can enjoy. Sushi is one of the most customizable foods I can think of, it can fit anyone! Vegetarian, gluten free, raw fish scaredy cats, seaweed haters, religious food restrictions. SER.I.OUS.LY you guys. Sushi can be amazing, you can do anything you want with it!! Just give it a chance! It is in my top five favorite foods, I was so upset that I waited 18 years of my life to try it. And I waited 6 more years to try to make it myself! It is way too easy, all you have to do is cook the rice and the stove does most of that for you.

Hubs and I tried our hand at making sushi a few months ago and it was one of the best days of my life. Honestly! I just happened to document the whole thing so you can try it yourself.

To make sushi, you will need:
  • Sushi rice (I subbed jasmine rice with amazing results)
  • Rice vinegar
  • Sesame oil
  • Nori (aka, roasted seaweed sheets)
  • Filling: veggies, meats, cheeses, seriously, whatever you want
  • Sushi rolling mat
  • Wax paper
I know it seems like a lot of new, scary things, but just trust me on this one. Check your local Asian market and you can get the vinegar, oil, nori, and mat for CHEAP! Less than 10 bucks, and it will last you foreverr. (Intentional spelling error, it was for emphasis.)


First thing's first, you gotta make the rice. I use a rice cooker, best wedding present ever. You'll need to cook the rice with a 1:1 ratio. Yes, I am serious. One cup rice, one cup water. Two cups rice, two cups water. I was totally skeptical, would the rice even be cooked? Yes in fact, it cooks just fine. Cook it as you normally would but using that 1:1 ratio. When it's done and still warm, drizzle it with rice vinegar and mix it in well until it's shiny. This could be anywhere from a tablespoon to a quarter cup, just drizzle, stir, drizzle, stir, until the rice is a little shiny. Then, drizzle a little bit of sesame oil on and mix well. Set it aside and let it cool completely.

While the rice is cooling, prepare your fillings. You can seriously put an.y.thing you want in your sushi. Get creative! From top left, we used: avocado, cream cheese, cucumber, carrot, imitation crab, smoked salmon, tuna salad. Cut or shred everything into very long, thin pieces.

Next, cut a large strip of wax paper and lay it on top of your sushi mat. Lay out your nori sheet. I carefully tore mine in half so we could try several mini rolls of different combinations of fillers instead. Spread a layer of cooled rice right on top of the nori. You can use a rice paddle or your fingers, just make sure whatever you use is moistened with water, that rice is very sticky!

Fillings! Lay your fillings out on one side. This roll looks like smoked salmon, avocado, and cucumber. Mmm. Try not to lay out too much, otherwise your sushi roll will be too fat and it'll be hard to work with.

This is probably the trickiest part, but after a time or two it'll feel much more natural. As tightly as you can manage, roll that sushi up. The wax paper will get caught up in the roll, so just move it out of the way as you roll.


I squeezed mine tightly when I was done rolling it but I have no idea of that's how you're supposed to do it.

Tadah!!!! Sushi! I may have either over stuffed or squeezed it a little too tightly, that's why it's overflowing. Oops.

Use a VERY sharp knife to cut the roll into 3/4 to 1 inch thick slices. It will not stay together if you try to cut them any smaller, trust me. It will fall apart into a heaping mess of rice. Still yummy, but not pretty. Did you notice that there are "inside out" rolls on our plates too?

To make an inside out roll, all you do is put the rice down before the nori. Make a neat little rectangle of rice.

Lay down the nori.

Fill it up! David stuffed this one a little too much. Cucumber, carrot, imitation crab. Mmmmmm.....

Roll it up in the same way you did before. That wax paper is sooo helpful, the mess the rice makes on the sushi mat is horrendous because it is so sticky. Slice it up into one inch thick slices.

Take a flirtatious picture with your husband.

And devour your mounds of delicious sushi. I think my favorite combo during this round was smoked salmon and cream cheese. Though the crab, cuke, and avocado was amazing too. Gahh, sushi is so gosh dang delicious! For us, three regular sized rolls is PLENTY for a meal. It only adds up to about a dozen little pieces , but sushi is very filling.

If you've never made sushi before, you should really give it a try. This is a great meal that you can make with your kids, there is next to no cooking and each child can choose what they want in their roll! You don't HAVE to put raw fish in it! Fill it full of chicken nuggets and garnish it with ketchup if you want.

.......ok no. Don't do that. Gross.

Happy cooking!

7.07.2011

How to eat a crab {a tutorial}

I think this is my first food related tutorial! I've seen a few before, like "how to eat an artichoke" but mine is way better. Why? Because crabs are better. Crabs are delicious, crabs are my LIFE. My summer could not be complete without a crab feast. Seriously. Anyone who was born and raised in Maryland will absolutely understand, all you other folk might not be quite as cool (but I still like you.)

So let me put out a warning before I start!

WARNING: if you...

  • Get sick really easily
  • Can't pick a drumstick clean
  • Can't stand the sight of guts
  • Don't like seafood

Or anything like that, you might want to skip this tutorial. I will literally be tearing apart an entire crab and picking it clean. If you are strong stomached, willing to try new things, love seafood, or are from Maryland, you'll be in for a treat. You are also in for a treat because this tutorial has GIFS!! Yes, GIFS, more than one. So excited about this!

Before we even get to eating the crabs, you first need crabs right? Now, I am talking about soft shell, blue crabs. None of these king, snow, or dungeness crabs. No way. Those are cop out crabs.

These little guys are the best. No other crab compares. If you can't find live crabs in your local grocery store, you will almost always be able to find them in an Asian grocery store. So, once you've gotten yourself at least a dozen FEMALE live crabs, you need to cook them. A dozen will feed 2-6 people, depending on your love for crabs. This recipe is directly from the {Old Bay website}, do not even THINK about trying to eat crabs without Old Bay seasoning.


Ingredients

  • water
  • vinegar
  • 1 dozen live blue crabs
  • 1/2 cup OLD BAY® Seasoning

Directions

  1. In a pot with a raised rack (minimum of 2 inches high), add equal quantities of water and vinegar to just below level of rack. Bring to a boil.
  2. Carefully layer crabs on rack; sprinkle each layer with OLD BAY. Cover and steam 20 to 30 minutes depending on size of crabs or until crabs turn red.


Easy right? So now you have a huge pot of cooked crabs and all the delicious meat is stuck inside. Now what? Before you get started you will need:

  • A table that can get a little dinged up (aka NOT the fancy dining room table)
  • Clothes that you don't mind getting guts on
  • Wooden mallets for everyone (these can be found in places like Willams-Sonoma or in craft stores)
  • Butter knives
  • LOTS of newspaper to cover your table
  • LOTS of Old Bay
  • LOTS of napkins
  • A big group of friends and family
This is God's gift to mankind. In a Maryland grocery store you will find a dozen different varieties in the spice section. But, if you live in any of the other 49 states, check the fresh seafood section right in front of the glass case with the fish. It should be on a little shelf right there. Most grocery stores have it, you just have to look in the right place. It'll set you back about 5 bucks and will last forever. Unless you are me, who puts it on everything. Then it will last a few months. 


Cover your table with newspaper, and keep a lot on hand, because you will soak through it fast. Feel free to double up, triple up, or even stack an entire newspaper under your work space.

Ahhh, delicious. It's like my whole life in one picture.

This is a girl crab. You can tell because the flap thingy looks like the capitol building. A boy crab's flap thing looks like the Washington monument. Girls are bigger, that's why we like to eat girls.

The first thing you need to do is pull the legs off. (I made a GIF!) Just gently squeeze the joint where the leg connects to the body, and wiggle and pull. Meat should come off with it, if not, just keep practicing. Do this for all the legs and the claws.

We'll get back to those later.

Getting rid of the legs will make it easier to tear the rest of it apart. Remember that flap thingy I talked about?


Pull it off. Throw it in the discard pile, there is nothing to eat. Next, we need to open the crab, because THAT'S where the good stuff is.

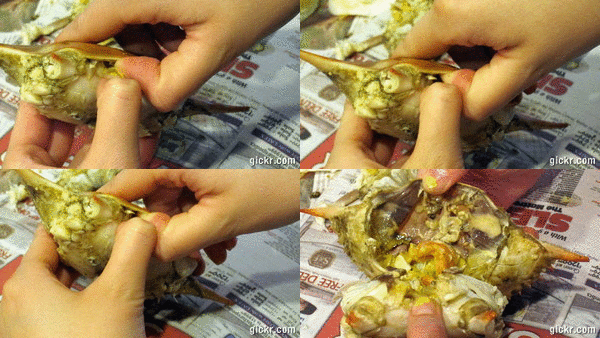
(Second GIF! Awesome.) Shove both your thumbs into the butt of the crab, and pry it open. Feel free to be totally grossed out by what you see. This is where the butter knife might come in handy, use it like a crow bar if you need it. Throw that top shell into the discard pile.

We're so close to getting to the good stuff! But we have to do a little digging. You want to get rid of the eyes, the gills, the eggs, and the "mustard." Basically everything you see on that initial layer has to go. I know what you might be thinking, but DO NOT run it under water. DO NOT! Just run your fingers through it, pick off and scrape out everything the arrows are pointing to and throw in the discard pile. Get out as much "mustard" as you can, because if you eat too much of that you'll get sick.

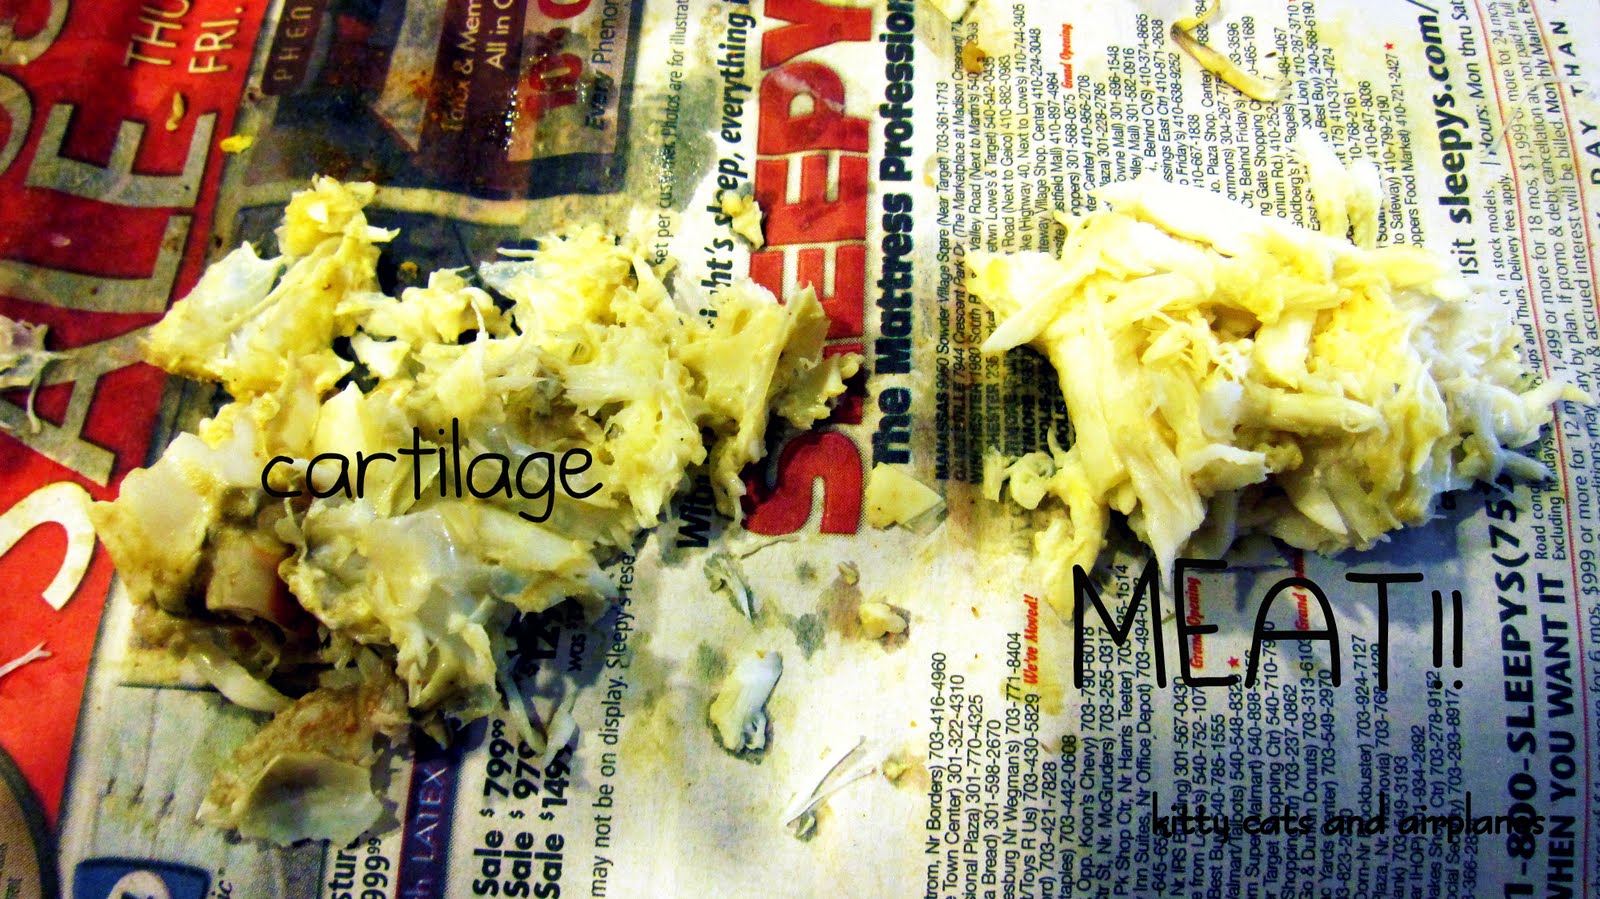
MUCH better. Now the only you have to deal with is cartilage!

Break it in half so you can really dig in.

My favorite part! I dream of this moment. Just dig right in and pull out the meat. You are looking for soft, white, flaky meat. Not flaky like fish, it will look more like shredded chicken, but on a much smaller scale. And much softer. If the meat is really mushy, not flaky, and smells rotten, you've got a bad crab. Don't eat it. (I know, some of you seafood haters can't think of anything that smells worse than this crab, but if it honestly smells rancid, don't eat it.)

You will have to do a ton of digging, there are lots of little areas that that delicious meat will be hiding. Throw all the cartilage in the discard pile.

The claws are fun! This is where the tools come in, because you can't really break the claws with your bare hands. The claws are all about smashing, basically you just need to hit it with that wooden mallet with crack the shell, and then dig in. Don't smash too hard, otherwise you'll end up with bits of shell in your meat. Yuck. If you are feeling adventurous, you can dig into those little legs, but there is very little meat there and if you are feeling frustrated just toss them in the discard pile.

This is about how much meat you'll get from a crab, deliciously sprinkled with Old Bay. Usually I just pick right through and eat as I see, it was really difficult for me to not eat as I was picking. I know, not that much for all the work you've put into it. But eating crabs is not about being stuffed with food, it's really the experience! You will have a BLAST eating them, and you will get better with every one. Wanna see the discard pile?

We weren't even done yet!


You are highly encouraged to play with your food. If you've never eaten crabs before, you should really consider trying! It is fun, delicious, and a great family activity. Especially when crab-hater mom is out of town. :D

Linking up here.

6.17.2011

Dentist's Dream French Toast

This is the best French toast ever. I got it out of a Congressional Club cookbook from my grandma (the '97 edition I think.) It's so easy, so delicious, and so fast. Try it, you won't regret. Also keep in mind that the better the bread it, the better it will be!

I made a recipe card because I forgot to take a picture of it and no blog post is complete without a picture! Enjoy.

6.13.2011

Funnel Cake

This is seriously one of the easiest desserts you could possibly make. It takes 10 minutes to come together, and less than a minute to cook. Perfection. Except they don't hold candles very well.

Forget paying $5 for these at the fair!

5.19.2011

Stir Fry

Huzzah! Last weeks Foodie Friday post that disappeared reappeared today! Yessss! To celebrate, I'm posting it a day early. :)

If you saw my post last Wednesday, I mentioned that I was going to make stir fry with some delicious looking veggies I got from the farmer's market down the street. (Yeah, like a half mile away. Be jealous.) This stir fry was so fantastic that there were NO leftovers. I even used each of the veggies in my "trifecta of nasty veggies" (which are: onions, bell peppers, and mushrooms) and even I devoured it. A real winner!

Chicken stir fry
  • 2 chicken breasts, cut into bite sized pieces
  • 4-5 cups cut up vegetables (I used onions, peppers, mushrooms, carrots, broccoli, and zucchini)
  • 2 tablespoons sesame oil
  • 10 oz. rice sticks (thin rice noodles)
  • Stir fry sauce (scroll down to see recipe)
Directions
  1. Get some water boiling for the rice sticks.
  2. Heat oil in skillet over medium high heat.
  3. Add chicken and cook for 5 minutes or so. It does not have to be cooked through at this point, it will have time to keep cooking.
  4. Turn off the heat to the boiling water (not the skillet!) and add the rice sticks. Let them soak for 5-7 minutes while you keep cooking. 
  5. Add veggies to the skillet with the chicken. I added the "harder" veggies; the onions, peppers, and carrots first since they take longer to cook, then I added the softer ones, the zucchini, broccoli, and mushrooms. 
  6. Fry everything together until the chicken is cooked through and veggies are crisp tender.
  7. Drain the noodles and rinse with cold water. Add them to the pan.
  8. Fry everything for a minute or two to let everything set up and come together, then add stir fry sauce.
  9. Allow sauce to come to boil, and boil for a minute or so to let it thicken. 
  10. Stir some more to mix and serve!
Stir fry sauce (originally found here)
  • 1 -1 1/2 tablespoon cornstarch
  • 2 Tbsp. cup brown sugar, packed
  • 1 pinch ground ginger (or a bit of fresh minced ginger)
  • 1 clove garlic, minced
  • 1/4 cup soy sauce or 1/4 cup tamari soy sauce
  • 2 Tbsp. cider vinegar or 1/8 cup white vinegar
  • 1/4 cup water
  • 3/4 cup vegetable broth or 3/4 cup beef broth or 3/4 cup chicken broth (I use chicken broth if my stir fry will have chicken, etc.)
Whisk to combine and add to the stir fry when needed. Makes 1 1/2 cups.

 Aside from chopping it honestly took me longer to write this post than it did to pull this dinner together. If you do some prepping chop work you can whip this up in no time at all!

5.06.2011

Foodie Friday- BBQ chicken pizza

About this time of year I start to crave all things barbeque. Chicken, burgers, hot dogs, anything that can be grilled, I want it. Today was no exception! But instead of busting out the grill, I busted out the sauce! I used a delicious 15 minute pizza dough recipe I had in my recipe box.

15-Minute Pizza Dough Recipe
  • 2 1/2 c. flour
  • 1 tsp. salt
  • 1 cup hot water
  • 1 Tbsp. sugar
  • 1 Tbsp. Rapid Rise yeast (has to be Rapid rise!)
  • 2 Tbsp. olive oil

  1. Preheat oven to 500°. 
  2. Mix hot water, sugar, and yeast together using a wooden spoon. Let rest until foamy. 
  3. Add olive oil and mix.
  4. Add flour and salt all at once. (Amie add in: I added half a tablespoon of onion powder, half a tablespoon of garlic powder, and half a teaspoon of celery salt to the mix!) 
  5. Attach dough hook to your mixer and mix on low for 5 minutes. (If you don't have a mixer just knead until smooth and elastic.) I added a few tablespoons of Parmesan cheese while the mixer was running. 
  6. Let rest 10 minutes. (Feel free to let it rise longer, just make sure you punch it back down before you knead.) 
  7. Press dough on pizza pan, stone, cookie sheet, whatever! Then top! (see below for my pizza today)
  8. Bake at 500 for 12-15 minutes. Yes, you make pizza from scratch in the time it takes to call in and wait for delivery.

To make the BBQ chicken pizza, top with:
  • 1/2 bottle of your favorite BBQ sauce (in place of regular pizza sauce)
  • Two cups or so of mozzarella cheese
  • One cooked chicken breast, cut into bite-sized pieces.

Yes, this is a very close up picture of one last piece after everyone was done eating. Oops. Forgive me?

4.19.2011

Banana chocolate smoothie recipe from Not so Homemade

Have you ever thought, "Man, Amie's blog design is sooo freaking cool, I wish mine looked like that." Well, if you ever have, you're in luck! Today's guest post comes from the incredibly talented Courtney! She totally revamped my blog a little while back. She's a lot of fun to work with, efficient, mind reading (as in she knew what I wanted when *I* didn't even know yet) and gets amazing results. She's got a fantastic recipe for you today, get ready to bust out the blog ol' blender (or the tiny blender, in Courtney's case!)
--------------------------------------------------------------------------------
Hello Kitty Cats & Airplanes readers!

I'm Courtney from over at Not So Homemade :)

I'm so excited to be guest posting so Amie can enjoy her LOVELY VACATION!

And what better way to enjoy a relaxing vacation than with...


a YUMMY Chocolate Banana Smoothie!


Seriously. I am IN LOVE with this smoothie recipe. And I'm a VERY picky smoothie drinker. I had yet to find a smoothie recipe that I could make at home that I loved. Until this recipe that is!

I was inspired by a comment from a reader and I tweaked her recipe to fit my tastes.


Here's what you need:

1 Banana

1 cup of milk

1 teaspoon of sugar

1 tablespoon of chocolate syrup


4 ingredients. That's it!

First, I peeled then cut up my banana (pictured is 2 bananas) and stuck it in the freezer for a while. I probably should have let them freeze longer, but, yea, I'm impatient. If they're on the mushier side, it's more of a drink consistency. If you let them freeze the whole way, they turn out more smoothie consistency.

Also, this is a great way to save those bananas that are starting to get "too ripe". Just peel, quarter, and freeze! They stay good for several days. They would probably be good longer, I just haven't been able to resist the smoothie long enough to let the bananas stay frozen :)


I added a cup of milk (whole milk- I'm not a super huge fan of any other kind).


Then 1 teaspoon of sugar. You could use sweetener, but I don't like the stuff.


Add your chocolate syrup. Just about a tablespoon or so. Or more... Until your heart's content :)


Then I added 1 frozen banana (4 chunks)...


And blended until smooth. I used this small personal serving size blender we have. Made by Hamilton Beach, I believe. I love it. Don't have to dirty up the big papa blender.


Pour and enjoy!


Here's an in-your-face close up... Mmmmmmmm!


I also made another variation. You can find the full post HERE!


Thanks Amie for letting me guest post! I hope you're enjoying your vacation!

--------------------------------------------------------------------------------
Oh goodness, doesn't that look amazing? In this hot southern weather I am drooling all over my keyboard for one of these! Take a minute to check out the rest of her delicious recipes and fun crafty tutorials! Also, if you're looking for a blog makeover, her work is fantastic!

Don't forget to enter the Knit Cookies giveaway! Ends 4.22

4.15.2011

Foodie Friday- Hearty Meatball Soup

This is yet another over so good you won't believe it recipe courtesy of Budget Bytes. Beth has so many delicious recipes, she is creative and knows how to make sweet magic with  flavors. Find the original recipe here.

Ingredients
  • 2 Tbsp olive oil
  • 1 medium onion
  • 3-4 med (1/2 lb) carrots
  • 3 stalks (1/3 bunch) celery
  • 4 cloves garlic
  • 1 (28 oz) can diced tomatoes
  • 4 lg cubes beef bouillon
  • 8 cups water
  • 6 oz. dry pasta (I used medium shells)
  • 26 meatballs (I used frozen Costco ones, thaw before adding to soup)
  • 1/2 bunch fresh parsley
  • Parmesan

Directions
  1. Wash, peel and dice the vegetables for the mirepoix (carrot, celery, onion, garlic). Cook them in a large pot with olive oil over medium heat until softened (5-10 minutes).
  2. Add the diced tomatoes, water and beef bouillon to the pot. Bring it up to a simmer then add the pasta and meatballs. Allow the pot to simmer for about 10-15 minutes or until the pasta is cooked through.
  3. While the pot is simmering, rinse and chop half a bunch of parsley. Add the parsley to the pot after the pasta has fully cooked.
  4. Serve each bowl of soup with freshly grated parmesan on top.

Makes 6-8 servings, depending how hungry everyone is. :)

This was a HUGE hit with everyone! I think everyone had a second serving. It is the perfect balance of beef and vegetable. Oh gosh, this is so good.
Related Posts Plugin for WordPress, Blogger...