Showing posts with label fabric. Show all posts

10.27.2011

Flynn Rider vest {a tutorial}

Ok, I need to first apologize for these awful pictures. (And my writing. It’s too late for me to be in front of a keyboard.)This vest was sewn during the wee hours of the morning when I was finally done with my work for the day. Translation: awful basement lighting + sleepy Amie = pretty bad pics. It’s kinda cool though, because the color of the fabric magically chances color from picture to picture!

…yay…


Hopefully you get the idea though.

You probably already know that David and I are going to be Flynn and Rapunzel for Halloween this year. I decided to make the costumes (with some help from my mom and some great suggestions from you guys). I made my dress entirely from patterns so no tutorial there, but I totally winged this vest! Honestly the only technique I really used was the making of the actual vest, the rest was merely looking at pictures of Flynn’s vest online and figuring out how I could make my look the same. There was no planning here.
281d0k
I thought his vest would be totally easy, but it turns out there are a lot of little details that I didn’t even notice on his vest! I did my best to point them out with the help of Picnik. I decided to forgo the collar of the vest, something told me David wouldn’t be too thrilled with such a high collar. But I’ll walk you through everything else I did

To make one, you will need:
  • A yard or so of bluish fleece
  • Husband’s t shirt (or little man’s or whoever this is for)
  • Lots of matching thread
  • Three thick hair ties
  • Three large coat buttons
  • A lot of patience. Ok, that was just me because I had to figure this all out along the way
IMG_2406
(Depending on if you got regular fleece or anti pill fleece, your fabric may or may not have a right/wrong side.) Turn the t shirt inside out, stuff the sleeves in, fold it in half, and lay it down on your folded fabric (right side up). Trace around the t shirt (I used chalk) with an extra half inch for seam allowance. Add a little extra room in the shoulders too, because Flynn has sleeves! Cut it out. This will be the back piece.
IMG_2407
Ta dah!! Back piece.
IMG_2408
Next, you’ll need two front pieces. Lay the t shirt back down, trace it again, but this time NOT on the fold (right side up again). I added a little bit to the front (which is why it’s slanted in the front instead of straight) so there would be room for the vest to button. Also added a slight v neck.

Three pieces now, a back piece and two front pieces. That’s all you need!
IMG_2415
Remember how I pointed out that the vest has cool texture? You could probably use some sort of corduroy or something…but fleece was on sale and I didn’t have to finish the edges if I didn’t want to, score one for the cheap/lazy woman! Anyway, I got the idea from {this faux chenille blanket tutorial} I loved how the lines and lines and lines of sewing made pretty texture, so I used the same technique her! Using a picture of Flynn’s vest as a guide, I drew out where I wanted to sew. The lines are about 1 1/2 inches apart. I tried to use a ruler, I really did. But I failed. Sew a straight line along the lines you drew.
IMG_2416
The effect is pretty subtle when you stare at it, but it really adds to the overall costume and it’s totally worth the extra half our of work.

Forgot to take a picture, but do the same thing for the lines above the…I think it’s called the yolk of the vest? That diagonal thing along the chest. So you’ll have sewn vertical lines running down under the chest, and diagonal lines above. Just look at the picture, it will make more sense. I sewed a little strip of fleece down over the diagonal line I made because that’s what it looked like I should do.

IMG_2418
Once I was done texturizing each front piece, I hemmed it along the edges 1/4 inch. Since fleece doesn’t fray, I only folded it down once.
IMG_2420
Looking pretty good so far! Love all that texture.


Next, sew the vest together. Pin the right sides of each front piece to the right sides of the back piece. Sew, using a straight stitch and 1/2 inch seams. Don't sew the front pieces together!


The sleeves. I put the vest on the hubs and marked with the chalk where his shoulders were. (Remember how we left a little bit of extra fabric in the shoulders?) I drew a straight line down from that mark, and then sewed along it using a teeny tiny zig zag stitch (I actually used the “button hole” stitch.) They aren’t real sleeves…but it’s close enough!
IMG_2466
I was going to put belt loops on anyway, but then I was looking at pictures and noticed that he actually did have belt loops. Awesome. I put the vest back on the hubs and marked his waist with the chalk. Then, just three strips of felt sewed directly onto the back. One on each side seam, one in the middle. I did nothing to try and hide seams here, you could probably be all seamstress-like and do that but my laziness got the best of me.


To make the “buckles” I just used hair ties and buttons. Flynn’s vest had some pretty cool hook and eye bronze looking buckles, but for the sake of time, money, and laziness, I went with this method. Mark where you want your buckles to be wit the chalk. Use three thick, brown hair ties, and sew them right on the vest. Be careful and go slowly, your machine might put up a fuss sewing through all that elastic. To make it more squarish, my mom suggested sewing it down twice, once at the top and once at the bottom, so when the hair tie is pulled it looks more like a rectangle. Does that make sense?


Oh, I should also mention that I added some extra fleece in the back for stability. One single layer of fleece might not like be pulled and tugged on so much. Sew-in interfacing would have been good here, but I lacked it in my stash.

IMG_2505
The next part SEEMS to be purely aesthetics, but sneaky you, you’re adding stability to the buttons. Yay! Mark the vest directly opposite of the hair ties, where the buttons will go. Sew down a small rectangle.
IMG_2506
Sew them on both sides! Those buttons are gonna get a lot of action, the fleece needs to hold up to it all!
IMG_2507
And sew on the buttons on top of those rectangles. These are lovely coat buttons from my grandma, thanks Mugga!!
IMAG0154-1-1
Slap the vest on one very patient man. I’ll post an updated picture when I get one, hubs is not too keen on getting dressed up like this unless he has to.
Outfit breakdown
  • Shirt: Owned it, we’ve got tons of white church shirts
  • Vest: I just told you how to make that….
    Belt: Owned it
  • Pants: Owned, than you Best Buy for making them a part of your uniform
  • “Boots”: from my sister’s high school drama department, they are just pull on prop boots
  • Shoes: Sunday shoes
  • Satchel: An old purse of mine from my Mugga, I think it’s Fossil?
A nice, cheap costume, Which is way more than I can say for my dress! Pics of that to come soon. And please let me know if this doesn’t make any sense. It’s late, I winged the whole thing, and….actually I can’t think of another reason.

10.17.2011

Thrift Store Frame to Jewelry Display! {a tutorial}

This tute is a long time coming! I made it during {Headband Week} in August, didn't write it up till September, and now here we are middle of October and I'm finally posting it! Oops. Onto the tute.

A thrifted frame to jewelry holder is one of the most common projects on a craft blog these days. Right up there with rosettes and an elastic waist skirt! Not that that is a bad thing, (I have BOTH on my blog! Well, now all three!) it's kind of fun to reinvent the wheel! Plus, it's one of those things that just WORKS, so why not give it a whirl? Aaaaaand I saw a million cute ones on Pinterest and I just had to try it. Stupid Pinterest.

See? I pinned it {here}

Or this one? {here} Gah, I almost feel silly posting mine!

Care to see it? Too bad, I'm showing you anyway.

I pretty much love it. Up until now, all my jewelry has been crammed in too small jewelry boxes, plastic bags, and strewn all over my room in heaps. Ugh, not cool. I love that everything is organized now and I can actually SEE what my options are! I kept all my fancy stuff in the pretty jewelry boxes, but the everyday stuff I hung up. Care to make your own?

You will need:
  • A sturdy wooden frame, it's gotta thick and it's gotta be wood
  • Sandpaper
  • Scrap fabric
  • Hot glue gun
  • Nails
  • Spray paint
  • A handy hubby that is good with tools

This is my frame. I felt so bad for it. Obviously it had been around for years and years and it never even got used. :( No matter, I gave it a good home and now I love it every day. :) I unwrapped it and sanded the crap outta it.

And covered it with several coats of "oil rubbed bronze" spray paint. Ah, already so much better! And shiny....

Seriously, what is it with cats??

Next I wrapped the back of the frame in some pretty fabric and hot glued the edges down. Pull tightly so it's nice and smooth on the front!


I knew I wanted some lace strips at the bottom to hang my dangly earrings, so I glued some down as well. Pull REALLY tightly because the weight of the earrings will make the lace sag. I also glued it down in the middle so it would be a little more stable.

I marked where I wanted all the nails to be with a crayon I found in a drawer. I marked some at the bottom of the frame for really long necklaces, at the top for short necklaces, and on the sides for bracelets.

This is where hubby came in! He very patiently and oh so skillfully nailed nails (redundant much?) into all of those little crayon marks...and there were a lot of them!

"Thanks honey! Oh wait....can you do one more things puh-leeeeeeeeeeeeeaze??"

"Can you install these knobs I got from Anthropologie (on clearance! Three bucks each!) onto this other wood board I spray painted? No...I don't know how to install them. Use those power tools and figure it out kay? Love you!"

I stuck the back back into the frame while the hubs humored my request. No real instructions there.

Then I hung it up and filled it up! That took just as long as the project itself, oi. Oh, did you notice the headband holder?

Thanks for figuring that out hubs! Now I can hand up all my headbands in one place and not have to search the whole house looking for one. (On a side note, I have many more headbands now. This picture is over two months old!)

Ahh, it makes my little nook so much more organized. I've been wearing lots my jewelry now that I can find everything! If you haven't tried one of these yet you really should, they make life so much better. At least 20% better. (Bro hoof!!)


the pinterest challenge


10.10.2011

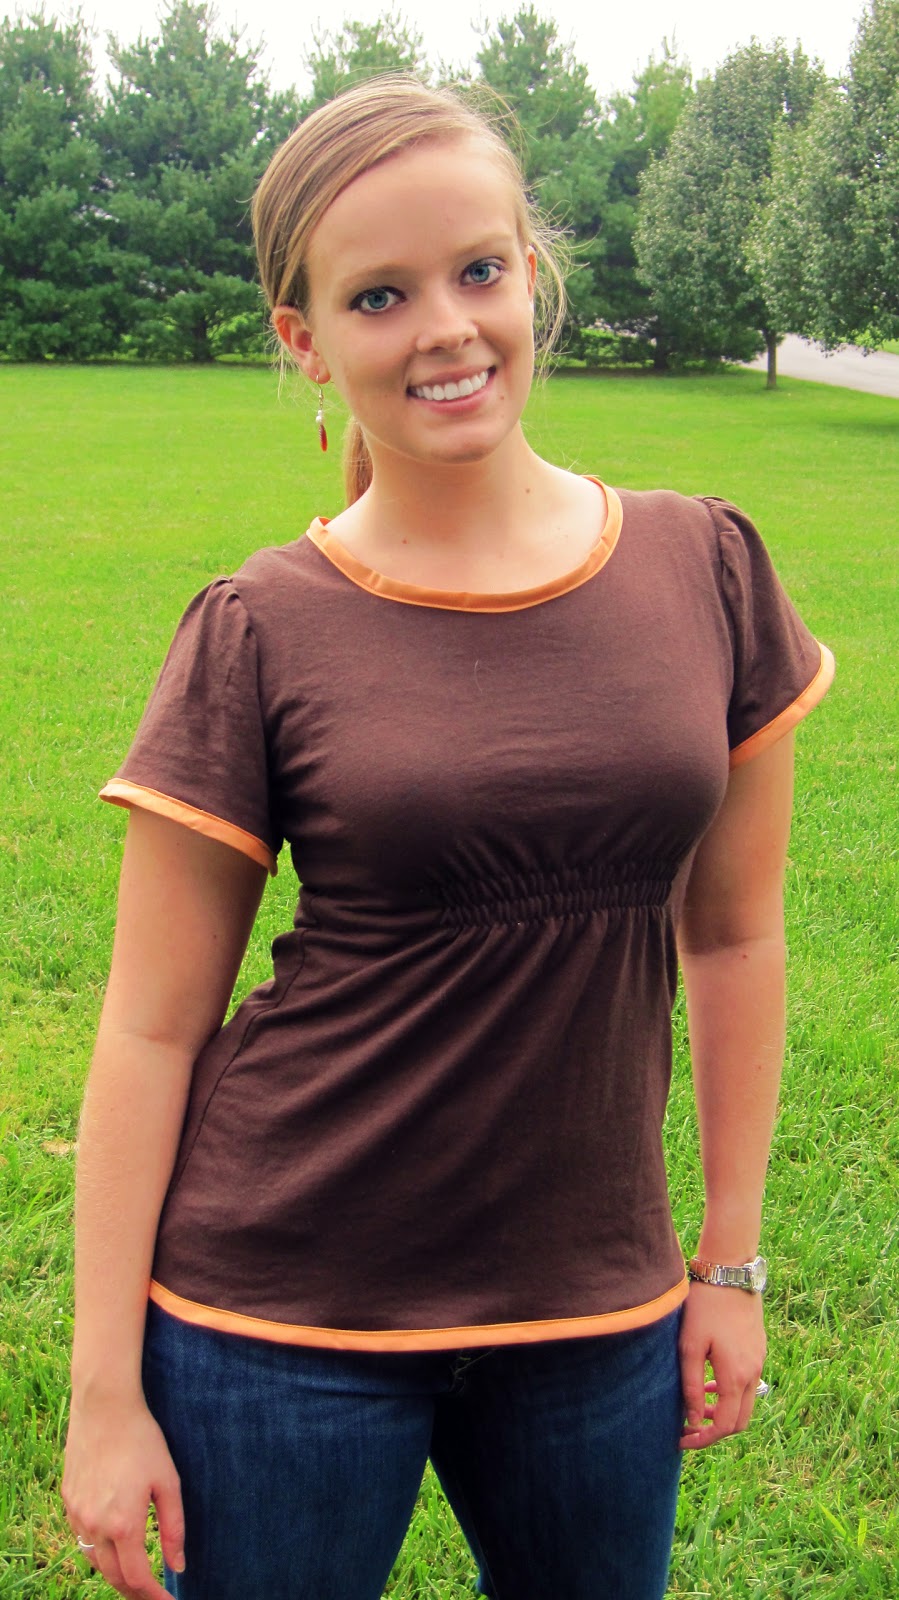
Shirred t shirt makeover

THANK YOU to everyone who has offered to guest post! Thanks to you, I'll be able to have my entire week filled with posts AND still get everything done I need to. Huzzah! Look for some amazing guest posts this week. Seriously, there are some wickedly talented ladies out there.

You might remember that I was in quite the funk just a little bit ago. I had lost my mojo and was so blah for few weeks. My friend {Crystal} helped get me out of it with a challenge to makeover a t shirt! This was such a fun challenge! I was so excited to coordinate with Crystal on this! It really helped spark my creativity, it helped me get my mojo back!


I love how it turned out! Flared waist, flared sleeves, shirring, pleats, color contrast, yay! I was inspired by the colors of fall, I can't wait for it to get a little cooler!

I also model part time. True story! Ok...not a true story. You wanna make one? You will need:

  • T shirt a size or two larger than what you normally wear
  • Scissors 
  • Disappearing ink pen, mark be gone pen
  • Rotary cutter/mat (not necessary, but will be helpful when cutting hems off!)
  • Extra wide bias tape, four yards. I used a three yard pack and I was one inch short! (NOTE: ribbing would have probably been better here, but I didn't have any)
  • Elastic thread
  • Ball point needle for sewing with knits
  • Sewing stuff: machine, matching thread, extra needles, all that stuff. 

And just as a note, I used 1/2" seams for this whole project unless otherwise noted.
Start with a t shirt a size or two larger than the size you wear to give you a little wiggle room and more fabric to work with.This is just a plain old brown t shirt from Jo-ann, got it on sale! (Still on sale, you can buy it {here})


Take that shirt that fits and turn it right side out. Shove the sleeves in and lay it directly centered on your t shirt. Using a fabric marking pen, trace around your shirt with a 5/8ish inch or so for seam allowance. I decided to flare out the bottom of the shirt, and make it a little more flowy.

Cut it out! Fold it in half before cutting to ensure that both sides are even. (It's much more flared I just couldn't get it all in the picture)

Pin and sew up the sides (right sides together!) using a zig zag stitch so the fabric can still stretch. Don't sew through the arm holes, unless you want to go for the straight jacket type look.

Next, sleeves. I used the original sleeve because I wanted it to flare out slightly too. To make it fit, I ruffled it a bit. To do this, run the sleeve through the sewing machine using the longest straight stitch possible and 1/4" seam allowance, leaving long threads. Then, gently pull the bobbin thread, and it'll start to gather! Ruffle it up until the sleeve is the same size as the arm hole.

Pin the sleeve on, right sides together, and sew. I like to double stitch my sleeves, since they tend to get pulled on a lot. Sleeves: good! Collar: not so much. Had to get rid of that t shirty collar.

Collar, meet scissors! I cut right under the original ribbing.

I added binding around the collar, to help it lay more flat. It may look funny in the back...that's because I was literally 1 inch short of binding! I however, am too stubborn to let it fly, so I created one tiny little pleat in the back to make up that extra inch.

See? One little pleat. Nothing fancy, but it did the job! And added a little bit extra interest. Ignore the terrible binding job. My getting way too long hair will hide it.

I also added binding to the bottom! I am lazy and I didn't feel like hemming one single thing. :D

When I thought I was done, I realized that something was missing. I thought about it a little, and then decided to add a bit of shirring right under the bust!

I had never successfully executed shirring, so this was rather exciting! I followed {this} awesome tutorial to get it right. I loved it, I can't wait to use this technique again!


Professional model. I tell ya. 

If this was confusing at all check out {this} t shirt redo I did last winter. It covers everything much more thoroughly. I was a little lazy and didn't go over it as much in depth this time around since it's very similar. 

Linking up {here}
Related Posts Plugin for WordPress, Blogger...