Showing posts with label tutorials. Show all posts

3.13.2012

Rubies and More knockoff (a tutorial)

This necklace was a special request by a friend who was gracious enough to take some pictures for my shop with her fancy camera. As compensation, I told her I'd make her anything she wanted, and she chose this beauty.

The {Rubies and More} necklace from {Sundance}. Sadly, it's no longer available, but I AM going to teach you how to make it so that should make up for it! I think it turned out really nicely.


I altered it a little bit according to what she wanted, like adding an extender chain. Want to make one yourself?

You will need:

  • Side drilled, tear drop shaped red beads. I needed two strands
  • Flat, coin shaped silver beads
  • Shiny faceted silver beads
  • Tiny little pearls
  • Extender chain
  • Lobster clasp
  • Thin cord. I used cotton cord but the original necklace uses leather.
  • Fray check (if using cotton cord)
  • E6000
  • Jump rings
  • Tiger tail or other stringing material
  • Crimp beads
  • Crimping tool

Yikes, that's a lot. Got it all?

Whenever I string beads, I always string directly onto the spool or tiger tail to make sure that I don't run out of material. String on about 15-20 red beads. Then alternate flat beads with pearls so that you end up with three silver beads and two pearls (I changed it after I took the pic.) Then strong on three more red beads.

Next, we need to finish this part of the necklace. String on a crimp bead and then a jump ring to the loose end of the tiger tail.

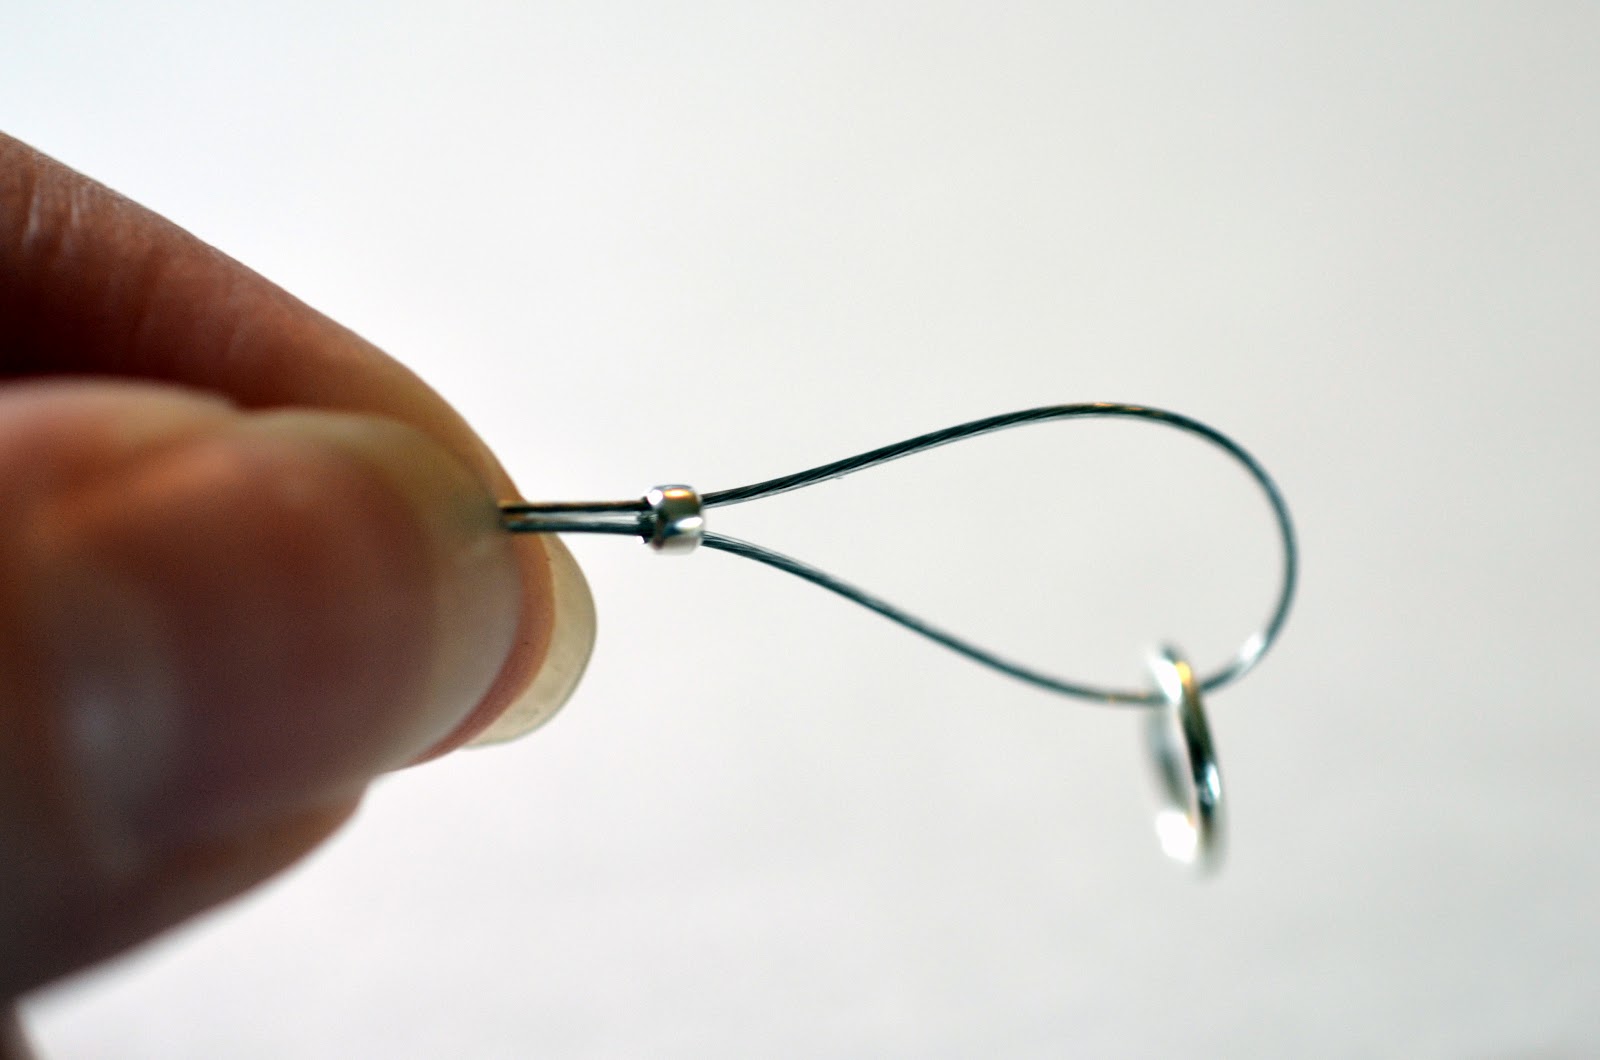
String the end back through the crimp bead, like so. Push the crimp bead up to close up that gap, you want the crimp bead to be close to the jump ring.

To use the crimp tool, line the crimp bead up into the second section of the crimp tool. Just look at the picture, because I know I didn't explain that well.

Squish it down.

Open it up again, and position the now squished crimp bead into the first section of the tool. See how it got smushed into a C shape? You want it to then be smashed on top of itself again. Think of it as a double knot.

Smush it. Now it's nice and secure.

This is what it should look like finished. Push all the beads up against the crimp bead (make sure to thread it through both strands of tiger tail). Now we'll do it to the other side.

Now you can cut off the strand of beads from the spool. Start off the same way as you did on the other side.

However, on this side, you need to thread that extra strand of tiger tail back through the beads. A little tricky!

Just pull it through the first bead or two, and keep pulling and adjusting until it's nice and tight. Then crimp it like you did on the other side. Does that make any sense at all? I'm no good with words. Thank you, pictures.

Now, the cord. Tie the cord around the jump ring.

I dabbed a drop of E6000 in the knot to make sure it didn't come undone. I also fray checked the ends when I cut it.

Divide those sparkly beads in half. String half of them onto one side, and half of them onto the other side. (After you've tied the cord on the other side, that is.)

It should look something like this. Tie a knot at the ends of the beads so that they don't slide around all over. Then, tie another loop at the end, just like you did with the jump ring.

Attach the lobster clasp to one side and the extender chain to the other. I added a silver bead to the end for decoration. If you were able to understand any of that, you should be done!!

Lay it out on some rocks in your backyard and take pictures of it. Or wear it, your choice. :)

Please let me know if you have any questions! I feel like this was more of a visual tutorial rather than a wordy one, so if you need more words, shoot me an email.

2.11.2012

Button Initial

You know what is awesome? Completing TWO pins on Pinterest in the last two weeks! Holla!!


This time it was Meg who pushed me to get this one done. She said "Hey, let's get together and do those cool button initials. I'll teach you how to cut vinyl with your Silhouette."

Sold. Plus my massive button collection is always looking to get dipped into.

I'm pretty sure she pinned something different, but I pinned {this one} on my {Crafty things I need to do} board a little while ago. Oh if I had a dollar for everything I pinned on there....I'd have $72. Not bad, anyone hiring?

I think it really perks up my crafting nook! It took a full week and a half to tear apart my nook, reorganize every bit of crafting crap I own, and then put it all in this fancy new IKEA shelf that I blew all my Christmas money on. Ahh. I love my new organized space.

A quick how to:

  • Get an empty 8x10, glassless frame. Cut out cute scrapbook paper to fit. 
  • Cut out a vinyl letter and stick it on the paper. If you don't have a craft cutter, just cut one out of cardstock and trace it onto your paper. 
  • Bust out the buttons and hot glue gun and glue, glue, glue! We did two layers of buttons so it would look really cohesive.
  • Let dry. Frame. Done. 

Sorry about the weird angles of all the pictures, there's kind of a pillar in the way.

Linking up here!


The Pinterest Challenge

2.08.2012

Solid perfume (a tutorial)

As promised, I present the tutorial for making solid perfume! I saw this on Pinterest a while ago and pinned it to my {Crafty things I need to do} board. And finally got around to trying it out!


I searched and searched for a vintage pocket watch or locket to fill with perfume, but after a few weeks I became way too impatient and ended up picking one up for $5 from Michaels. Then I realized I had NONE of the ingredients I needed to make solid perfume. Argh. So I spent a few weeks researching and and comparing products and waiting for everything to come in the mail. Why I bought ingredients online and waited around for them to arrive escapes me. Wait, that's a lie. It's because it was much cheaper that way. Getting off topic...

Yay! If you follow me on {facebook} you're probably sick of seeing these, they are the newest addition to my shop! But they are so much fun (and addicting) to make, I thought I'd share the how-to as well!


To make solid perfume, you will need:
  • Beeswax
  • Carrier oil (I use a combo of sweet almond oil and coconut oil.)
  • Essential oils
  • Oral syringe (find it in the medicine aisle of the grocery store)
  • Locket
  • Old metal/glass bowl that you will never use for food again.
  • Plastic spoon
I didn't really follow the pinned tutorial very well. I researched several different recipes and sort of mashed them together and came up with my own. Through experimentation, I discovered that a 1:1 beeswax/carrier oil made the best perfume base. Not too solid, not too lip balmy. Since I decided to use a combo of two different carrier oils (sweet almond and coconut) it comes out to be a 2:1:1 beeswax:sweet almond:coconut oil ratio.

 For this huge locket, I did a teaspoon of beeswax...

...and a half teaspoon of the oils. It ended up being way too much. 

Bring a small amount of water to a boil in a pot small enough to NOT let metal/glass bowl fit in. We're making a double boiler here. 

Combine all three into the bowl and place it on top of the boiling pot of water. The steam will quickly melt the three together. I mean in like less than a minute. 

Stir with the plastic spoon to combine. Stir really well, otherwise you'll end up with pockets of oil in the beeswax. Not cool. 

It really does melt fast! Stir, stir, stir, then turn the heat off. 

Add your oils. For this particular locket I used a headache relief blend (since I am an almost daily sufferer...) a 50/50 peppermint/lavender. Mix really well again, but do this quickly because the perfume will harden pretty quickly. The amount of essential oils added was different everywhere I looked, so I just had to wing it. I added about 25-30 drops total. 

Fill the oral syringe with your perfume. This makes it a lot easier to fill the locket. 

....though it's not a perfect science. 

Let the perfume harden for at least 15 minutes before disturbing it. (10 BFF points if you sang that.)

Then comes the fun part, turning it into something beautiful!

To apply solid perfume, rub your fingers on the perfume and smooth it onto your pressure points. Wrists, behind the ears, etc. Since I made this amazing headache relief batch, I massage it into my temples and at the nape of my neck to work in the magic. 

Another added bonus: Your body acts like a candle warmer. The heat from your body will release the oils in the locket and you will smell gorgeous all day. I've now made three of these for myself (and another half dozen that I've sold) and the scent really sticks with you. All in all, a wonderful pin. I hope you enjoy it! 

I'm linking this up to...


The Pinterest Challenge


Because Becca inspired me to actually do one of my pins! And linking up to a few other fun {parties}

2.02.2012

Quilted Valentine's Day table runner (a mini tutorial)

You know you've been away from blogging for a while when your dad calls you and says, "Hey, how come you haven't posted a tutorial in a while? I miss seeing your tutorials."

Yikes. I guess it's been longer than I thought since I really posted something crafty huh? I promise I'm being crafty, not nearly as much as I was, but I am! I've been crafting a ton with {Caroline} and {Meg} which means that tutorials are much less likely to happen. Who remembers to take pictures of every little step when you're busy laughing about the funny things your husband does?

I sure don't. In fact, I'm lucky if I remember to take a single picture at all! :) You know how it gets, right?

Sooo...wanna see my almost quilted Valentine's Day table runner?

Yay! I sewed something! Meg let me dip into her fat quarter stash to make this cute runner. Since I didn't take pictures, maybe a play by play will suffice? (Please nod in agreement.)

1) Cut fat quarters into strips. I cut some of them into 4 strips and some into 2 strips. Since they are already the same width everything will line up nicely! I think we used 8 or so fat quarters between the two of us.
2) Sew all the strips together with a 1/4" seam, right sides together. You'll end up with a really long runner, we both cut ours in half since neither of us had a table even close to long enough to hold the runner!
3) Even out your edges with a rotary cutter so everything is nice and straight.
4) Cut out a piece of thin batting and a piece for the backing.
5) Sandwich the batting in between the backing and the top.
6) Baste around the edges. Trim any excess fabric and make sure it's still nice and square.
7) Use decorative stitching (we used a fancy zig zag that makes it look like it's hand stitched) in between each strip.
8) Round your corners with a bowl (I only did this because I didn't have quite enough binding...it sort of give it the appearance of a changing pad so you might want to skip this step.)
9) Apply quilt binding around the unfinished edges.
10) Admire your work.

Um...tada?

We threw in some yellow so the runner could transition into spring nicely. Score one for the lazy crafter! :)

What have you been working on lately?

PS: I am having a facebook exclusive Valentine's Day sale on a whole bunch of jewelry. The sale ends tomorrow so get the deals while you can! {here}

12.18.2011

The "cheating" post, jewelry with buttons

I know, I know, the whole series was "Jewelry Making for the Non-Jewelry Maker" and it required no special tools or supplies. Well...these both have just a teensy bit of special supplies. But they were so easy to do I had to include them! You've still got a week left till Christmas! You can totally knock these out. Easy.

 The main ingredient of the jewelry today? Buttons. Yes, buttons. You'd be amazed at the buttons you can find these days, some of them don't look like buttons at all! Like that pretty pink pendant. Yes, it's a button, and this is the easiest necklace ever! Less than a minute to make.

You will need:

  • Button
  • Jump ring
  • Premade necklace (you can find these at Hobby Lobby)

That's it! Wait for buttons to go on sale and you've got a majorly inexpensive present. To make one:

Take button off of paper. Open the jump ring, thread it through the button.

Attach it to the necklace. Close the jump ring. Told you it was easy!


And the results are lovely! Only hardcore Joann stalkers will ever know that you're wearing a button around your neck. Ready for some easy peasy earrings?

You will need:

  • Small buttons
  • Two earring posts
  • Button shank removers (Six bucks at Joann in the button aisle. Bring your coupon)
  • Hot glue gun (E6000 would be better)

This one is a teeny tiny itsy bitsy more tricky, but it'll still take you less than a minute to make!


Using the button shank removers, remove the shank of the button.

Bam. Now it has a flat back.

Do it again to another button so you can have a pair (unless you only have one pierced ear, in which case skip this step)

Bam. Pretty rose earrings on the cheap, no cabochons required. I'll spare you another picture of my face, you get the idea right?

I hope you enjoyed my little series! Remember, next month I am redoing "Jewelry Making 101" which should cover everything you ever wanted to know about making your own jewelry. Got a question? Shoot me an email and I'll cover it in the series.

Happy crafting!
Related Posts Plugin for WordPress, Blogger...