Showing posts with label Sewing. Show all posts

4.15.2012

Oh yeah, this is a craft blog!

When was the last time I actually posted something crafty I'd done? Geeze, I don't even wanna know. I promise I still do crafty things, but lately it's been working on jewelry, filling orders, and the like. Ah, the life of a handmade sorta business owner. The shop is going through some fun changes right now, I can't wait to show you everything I've been working on!!

I've been working on a great Amy Butler bag! The fabric isn't Amy Butler....it's Joann, but I thought it was really cute and you know how obsessed I am with gray and yellow. I added the monogram using my Silhouette (named Stella...it'll make sense in a second.) and I love the touch it adds!

The other night {Meg} and I got together and crafted the night away. Using a ruffler foot (great invention!!) we made these fantastic ruffled bookmarks. Took about 10 minutes each, pair it with an Amazon giftcard and you've got a great gift for a reader!

There are sooo many sewing projects on my to do list! I've really missed Bella! (My sewing machine. Stella and Bella are my BFFs)

What's been on your crafty plate? Share with me, I love new ideas!

2.02.2012

Quilted Valentine's Day table runner (a mini tutorial)

You know you've been away from blogging for a while when your dad calls you and says, "Hey, how come you haven't posted a tutorial in a while? I miss seeing your tutorials."

Yikes. I guess it's been longer than I thought since I really posted something crafty huh? I promise I'm being crafty, not nearly as much as I was, but I am! I've been crafting a ton with {Caroline} and {Meg} which means that tutorials are much less likely to happen. Who remembers to take pictures of every little step when you're busy laughing about the funny things your husband does?

I sure don't. In fact, I'm lucky if I remember to take a single picture at all! :) You know how it gets, right?

Sooo...wanna see my almost quilted Valentine's Day table runner?

Yay! I sewed something! Meg let me dip into her fat quarter stash to make this cute runner. Since I didn't take pictures, maybe a play by play will suffice? (Please nod in agreement.)

1) Cut fat quarters into strips. I cut some of them into 4 strips and some into 2 strips. Since they are already the same width everything will line up nicely! I think we used 8 or so fat quarters between the two of us.
2) Sew all the strips together with a 1/4" seam, right sides together. You'll end up with a really long runner, we both cut ours in half since neither of us had a table even close to long enough to hold the runner!
3) Even out your edges with a rotary cutter so everything is nice and straight.
4) Cut out a piece of thin batting and a piece for the backing.
5) Sandwich the batting in between the backing and the top.
6) Baste around the edges. Trim any excess fabric and make sure it's still nice and square.
7) Use decorative stitching (we used a fancy zig zag that makes it look like it's hand stitched) in between each strip.
8) Round your corners with a bowl (I only did this because I didn't have quite enough binding...it sort of give it the appearance of a changing pad so you might want to skip this step.)
9) Apply quilt binding around the unfinished edges.
10) Admire your work.

Um...tada?

We threw in some yellow so the runner could transition into spring nicely. Score one for the lazy crafter! :)

What have you been working on lately?

PS: I am having a facebook exclusive Valentine's Day sale on a whole bunch of jewelry. The sale ends tomorrow so get the deals while you can! {here}

10.27.2011

Flynn Rider vest {a tutorial}

Ok, I need to first apologize for these awful pictures. (And my writing. It’s too late for me to be in front of a keyboard.)This vest was sewn during the wee hours of the morning when I was finally done with my work for the day. Translation: awful basement lighting + sleepy Amie = pretty bad pics. It’s kinda cool though, because the color of the fabric magically chances color from picture to picture!

…yay…


Hopefully you get the idea though.

You probably already know that David and I are going to be Flynn and Rapunzel for Halloween this year. I decided to make the costumes (with some help from my mom and some great suggestions from you guys). I made my dress entirely from patterns so no tutorial there, but I totally winged this vest! Honestly the only technique I really used was the making of the actual vest, the rest was merely looking at pictures of Flynn’s vest online and figuring out how I could make my look the same. There was no planning here.
281d0k
I thought his vest would be totally easy, but it turns out there are a lot of little details that I didn’t even notice on his vest! I did my best to point them out with the help of Picnik. I decided to forgo the collar of the vest, something told me David wouldn’t be too thrilled with such a high collar. But I’ll walk you through everything else I did

To make one, you will need:
  • A yard or so of bluish fleece
  • Husband’s t shirt (or little man’s or whoever this is for)
  • Lots of matching thread
  • Three thick hair ties
  • Three large coat buttons
  • A lot of patience. Ok, that was just me because I had to figure this all out along the way
IMG_2406
(Depending on if you got regular fleece or anti pill fleece, your fabric may or may not have a right/wrong side.) Turn the t shirt inside out, stuff the sleeves in, fold it in half, and lay it down on your folded fabric (right side up). Trace around the t shirt (I used chalk) with an extra half inch for seam allowance. Add a little extra room in the shoulders too, because Flynn has sleeves! Cut it out. This will be the back piece.
IMG_2407
Ta dah!! Back piece.
IMG_2408
Next, you’ll need two front pieces. Lay the t shirt back down, trace it again, but this time NOT on the fold (right side up again). I added a little bit to the front (which is why it’s slanted in the front instead of straight) so there would be room for the vest to button. Also added a slight v neck.

Three pieces now, a back piece and two front pieces. That’s all you need!
IMG_2415
Remember how I pointed out that the vest has cool texture? You could probably use some sort of corduroy or something…but fleece was on sale and I didn’t have to finish the edges if I didn’t want to, score one for the cheap/lazy woman! Anyway, I got the idea from {this faux chenille blanket tutorial} I loved how the lines and lines and lines of sewing made pretty texture, so I used the same technique her! Using a picture of Flynn’s vest as a guide, I drew out where I wanted to sew. The lines are about 1 1/2 inches apart. I tried to use a ruler, I really did. But I failed. Sew a straight line along the lines you drew.
IMG_2416
The effect is pretty subtle when you stare at it, but it really adds to the overall costume and it’s totally worth the extra half our of work.

Forgot to take a picture, but do the same thing for the lines above the…I think it’s called the yolk of the vest? That diagonal thing along the chest. So you’ll have sewn vertical lines running down under the chest, and diagonal lines above. Just look at the picture, it will make more sense. I sewed a little strip of fleece down over the diagonal line I made because that’s what it looked like I should do.

IMG_2418
Once I was done texturizing each front piece, I hemmed it along the edges 1/4 inch. Since fleece doesn’t fray, I only folded it down once.
IMG_2420
Looking pretty good so far! Love all that texture.


Next, sew the vest together. Pin the right sides of each front piece to the right sides of the back piece. Sew, using a straight stitch and 1/2 inch seams. Don't sew the front pieces together!


The sleeves. I put the vest on the hubs and marked with the chalk where his shoulders were. (Remember how we left a little bit of extra fabric in the shoulders?) I drew a straight line down from that mark, and then sewed along it using a teeny tiny zig zag stitch (I actually used the “button hole” stitch.) They aren’t real sleeves…but it’s close enough!
IMG_2466
I was going to put belt loops on anyway, but then I was looking at pictures and noticed that he actually did have belt loops. Awesome. I put the vest back on the hubs and marked his waist with the chalk. Then, just three strips of felt sewed directly onto the back. One on each side seam, one in the middle. I did nothing to try and hide seams here, you could probably be all seamstress-like and do that but my laziness got the best of me.


To make the “buckles” I just used hair ties and buttons. Flynn’s vest had some pretty cool hook and eye bronze looking buckles, but for the sake of time, money, and laziness, I went with this method. Mark where you want your buckles to be wit the chalk. Use three thick, brown hair ties, and sew them right on the vest. Be careful and go slowly, your machine might put up a fuss sewing through all that elastic. To make it more squarish, my mom suggested sewing it down twice, once at the top and once at the bottom, so when the hair tie is pulled it looks more like a rectangle. Does that make sense?


Oh, I should also mention that I added some extra fleece in the back for stability. One single layer of fleece might not like be pulled and tugged on so much. Sew-in interfacing would have been good here, but I lacked it in my stash.

IMG_2505
The next part SEEMS to be purely aesthetics, but sneaky you, you’re adding stability to the buttons. Yay! Mark the vest directly opposite of the hair ties, where the buttons will go. Sew down a small rectangle.
IMG_2506
Sew them on both sides! Those buttons are gonna get a lot of action, the fleece needs to hold up to it all!
IMG_2507
And sew on the buttons on top of those rectangles. These are lovely coat buttons from my grandma, thanks Mugga!!
IMAG0154-1-1
Slap the vest on one very patient man. I’ll post an updated picture when I get one, hubs is not too keen on getting dressed up like this unless he has to.
Outfit breakdown
  • Shirt: Owned it, we’ve got tons of white church shirts
  • Vest: I just told you how to make that….
    Belt: Owned it
  • Pants: Owned, than you Best Buy for making them a part of your uniform
  • Boots”: from my sister’s high school drama department, they are just pull on prop boots
  • Shoes: Sunday shoes
  • Satchel: An old purse of mine from my Mugga, I think it’s Fossil?
A nice, cheap costume, Which is way more than I can say for my dress! Pics of that to come soon. And please let me know if this doesn’t make any sense. It’s late, I winged the whole thing, and….actually I can’t think of another reason.

10.11.2011

Guest post: Cross body hipster from Vibrant Designs

Today we have my ultimate lifesaver: Julie from {Vibrant Designs} Julie is an absolute GEM, she has saved my butt on so many occasions! She's guest posted for me, hosted giveaways, and reads my very long emails. She is wonderful, I am so happy to have her share this tutorial with you, it's one of my favorites!
-------------------------------------------------------------------


I am so happy to be here at Kittycats and Airplanes today!!  Thank you so much Amie for having me! 
How many of you are avid craft fair goers? {Amie insight: ME!!!} Or you absolutely love a day at the amusement park?  Maybe you simply love walking the mall?  I have the perfect bag for all of those activities and more!  It's small, roomy, lightweight, sits right at hip level, has an adjustable strap...I mean really? Can you ask for anything more 'convenient?' 
This past summer, I used my Crossbody Hipster Bag when I went to a large amusement park.  I was able to keep my cash, cell phone, keys right next to me...on EVERY RIDE!!  I didn't lose a thing.  Here is how you can make your own!

If you'd like to make one for yourself, here are the detailed with full photo instructions.  :)  If you would like to have one and don't know how to sew, I accept custom orders!  These sell for $25 in my etsy shop! {Another Amie comment: what an amazing price!}
Materials needed:
1/2 yd of outer fabric
1/3 yd of lining fabric
1   12” zipper to match outer fabric
Coordinating thread
1/3 yd fusible fleece
1/3 yd of fusible heavyweight interfacing (optional)
NOTE:
*(I interface my lining with heavyweight fusible interfacing just for a bit more added stability. You really don’t HAVE to interface the lining though. Fusible fleece is pretty stiff all by itself!
Directions
1. Cut from the fabric and interfacing...
2 outer fabric (your choice) 8 ½” x 10 ½” or 9 ½” x 11 ½”
2 inner fabric to the same that you choose above.
2 fusible fleece to match the outer fabric size
2 fusible heavyweight interfacing (optional)
2 outer fabric pocket pieces 2” shorter than your outer pieces. So 6 ½” x 10 ½” or 7 ½” x 11 ½”
2 lining fabric pieces 6 ½” x 10 ½ or 7 ½ x 11 ½
2 outer fabric 1 ½” x 44”
Interface the 2 outer fabric pocket pieces
2. Iron your interfacing to your pieces per the manufacturer’s directions.
-Cut a 1” square from each corner of the bottom of all four rectangles and all four pocket pieces.

3. Assemble the pockets (or do one pocket if you prefer)
-With right sides together, sew along the length of the fabric on the side that does not have the squares cut out.
-Turn right side out and iron seam flat. Pin in place and topstitch along the same seam.

-Pin your completed pocket to one of the outer fabric pieces with the raw edges touching. The right side of the fabric should be facing outward. Baste stitch along the bottom to hold pocket in place.
-Measure from side to side of the pocket with a tape measure to mark a middle point on your pocket. Repeat this step one inch above the mark to make another mark. Draw a line using these two marks as a guide, from top to bottom of the pocket piece. Sew down this line creating your two pockets. Backstitch at each end a few times. The more support the better!

4. Assemble the handle
-Fold over about ½” on the long side of a handle piece and press all the way down the length of the handle.
-Do the same for the other side.
-Fold the strap in half length wise and pin in place. The strap is very skinny so this can be awkward.

-Sew all the way down the open side of EACH handle. You should have two long skinny straps.
-As you near the end of each strap piece, gently unfold the end as you see in the series of photos.

fold a short end of the handle piece over ½”.  Sew this seam in place. You only need to do this to one side of each handle as the raw side will be sewn into the bag. Follow these same directions for the second handle piece.
**If you prefer, you can fold and sew the short ends down before you press the length of the handles.  I chose to do it this way because of a lack of time**

5. Attaching the zipper
-You’re going to make a fabric/zipper sandwich. Lay one of your outer pieces right side up. Lay your zipper on top, with right side of zipper facing downward as shown in the photo. Take your one lining piece of fabric and lay it on top of the zipper right side down. Pin all three in place.

-NOW you have a zipper sandwich. You can use a regular foot or a zipper foot but sew close to the zipper teeth. (If you get too close, your zipper gets snagged on the fabric, if you get too far, it won’t catch all the fabric layers…it can be tricky, but just keep at it!)
-Pull the outer fabric and lining fabric away to reveal your zipper on the inside. Pin the fabrics back and away from the zipper, and together. Top stitch along the zipper with 1/8” seam allowance. This makes it look much nicer and holds that outer fabric down. Follow these same steps for the other two pieces of fabric.

6. Assembling the Bag.
Don’t forget to unzip your zipper before this next part!
-Pull the outer fabric pieces away from the lining. Pin the outer fabric pieces in place with right sides together. Now pin your lining pieces together. You should have a long rectangle with your zipper in the middle.


-Pin one end of one handle just below the zipper between the two outside fabric pieces. Sandwich the rest of the handle between the two pieces of fabric well within the edges of the bag so as not to get them caught in your machine while sewing the edges down later. Take the other strap and pin it in place on the other side of the zipper between the two outer fabric pieces. Be sure to sandwich this strap nicely between the two outer fabric pieces. As you can see in the photo below, I also angle the strap up towards the zipper.

*NOTE*
(When I pin the straps, I let them fall out the bottom of the lining pieces because this is where I will leave the hole in the lining for turning later)
-Start at the bottom of the lining, about 2” away from the corner. Begin sewing all the way around the bag. I backstitch at the beginning a couple times.
-When sewing over the zipper and handle, I stitch back and forth 5-6 times for stability.
-The bottom, top and sides should be secure now but you should have 4 squares still open at each corner of the bag. Pull the two fabrics away from each other and line up the edges. You should have a straight line instead of a square now. Pin and sew this in place.

-Repeat previous step for the other three squares.
-Trim excess seam allowance from all four corners and along the sides.  Be sure not to clip into the seam itself!!

-Pull the body of the bag, straps and everything through the hole in the lining. Give the bag a good once over for any places you might have missed the fabric.

 If all is as you want it to be, pin the hole in the lining and tuck it into the bag. VOILA!!
A Crossbody Hipster!


----------------------------------------------------------------------
Can you see why it's one of my favorites? Love it! Thanks Julie! :) Come back tomorrow for some more guest posting goodness. 

10.10.2011

Shirred t shirt makeover

THANK YOU to everyone who has offered to guest post! Thanks to you, I'll be able to have my entire week filled with posts AND still get everything done I need to. Huzzah! Look for some amazing guest posts this week. Seriously, there are some wickedly talented ladies out there.

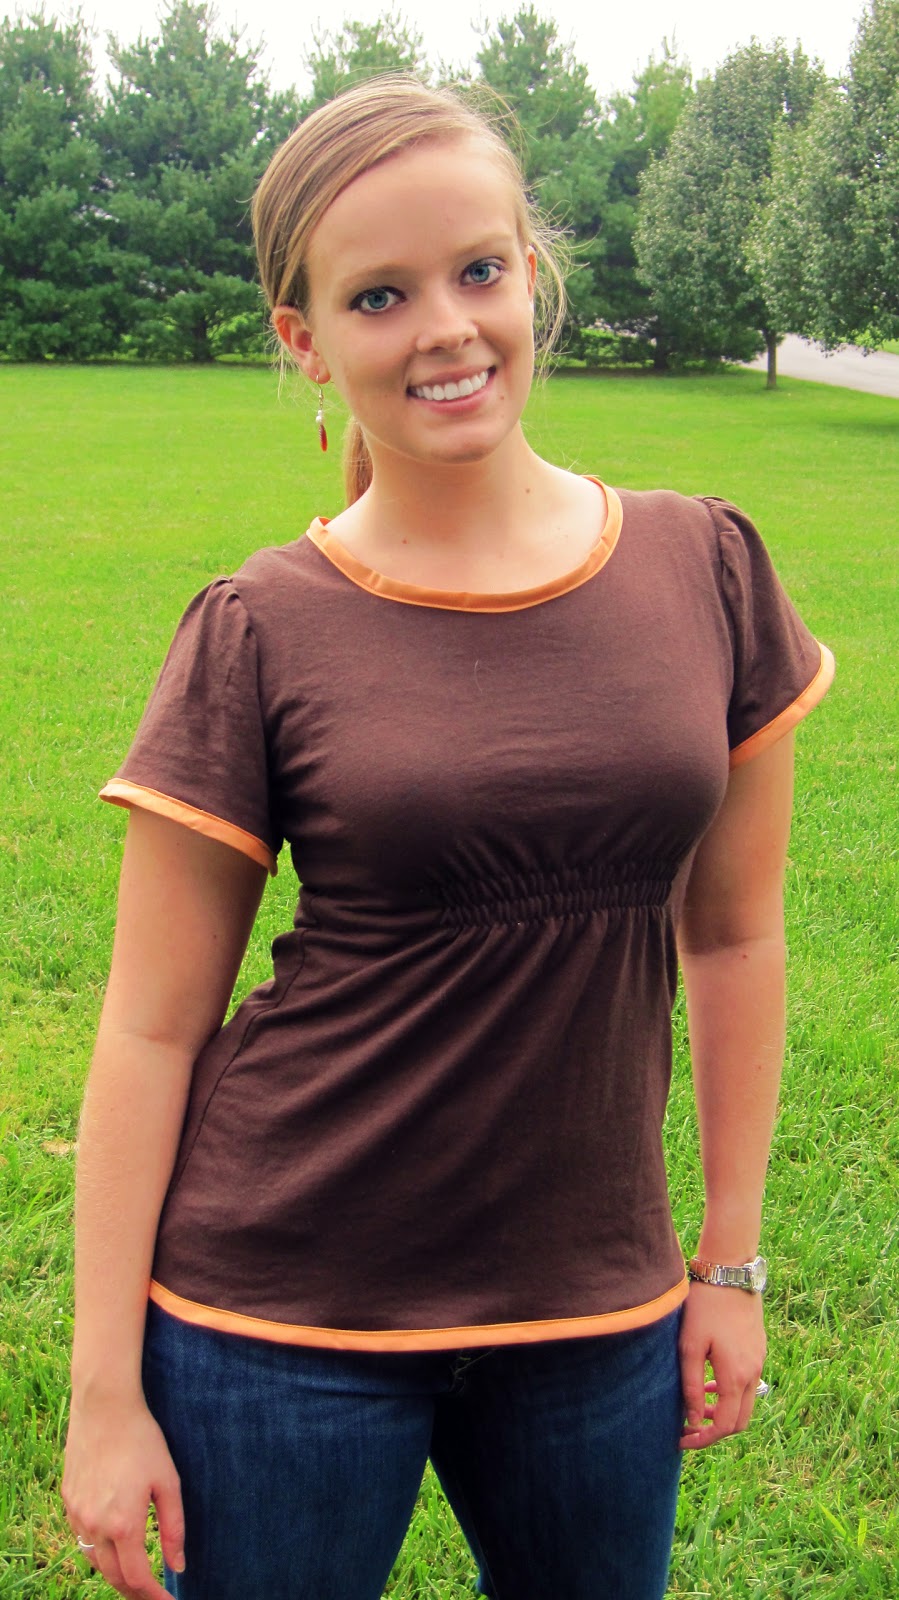
You might remember that I was in quite the funk just a little bit ago. I had lost my mojo and was so blah for few weeks. My friend {Crystal} helped get me out of it with a challenge to makeover a t shirt! This was such a fun challenge! I was so excited to coordinate with Crystal on this! It really helped spark my creativity, it helped me get my mojo back!


I love how it turned out! Flared waist, flared sleeves, shirring, pleats, color contrast, yay! I was inspired by the colors of fall, I can't wait for it to get a little cooler!

I also model part time. True story! Ok...not a true story. You wanna make one? You will need:

  • T shirt a size or two larger than what you normally wear
  • Scissors 
  • Disappearing ink pen, mark be gone pen
  • Rotary cutter/mat (not necessary, but will be helpful when cutting hems off!)
  • Extra wide bias tape, four yards. I used a three yard pack and I was one inch short! (NOTE: ribbing would have probably been better here, but I didn't have any)
  • Elastic thread
  • Ball point needle for sewing with knits
  • Sewing stuff: machine, matching thread, extra needles, all that stuff. 

And just as a note, I used 1/2" seams for this whole project unless otherwise noted.
Start with a t shirt a size or two larger than the size you wear to give you a little wiggle room and more fabric to work with.This is just a plain old brown t shirt from Jo-ann, got it on sale! (Still on sale, you can buy it {here})


Take that shirt that fits and turn it right side out. Shove the sleeves in and lay it directly centered on your t shirt. Using a fabric marking pen, trace around your shirt with a 5/8ish inch or so for seam allowance. I decided to flare out the bottom of the shirt, and make it a little more flowy.

Cut it out! Fold it in half before cutting to ensure that both sides are even. (It's much more flared I just couldn't get it all in the picture)

Pin and sew up the sides (right sides together!) using a zig zag stitch so the fabric can still stretch. Don't sew through the arm holes, unless you want to go for the straight jacket type look.

Next, sleeves. I used the original sleeve because I wanted it to flare out slightly too. To make it fit, I ruffled it a bit. To do this, run the sleeve through the sewing machine using the longest straight stitch possible and 1/4" seam allowance, leaving long threads. Then, gently pull the bobbin thread, and it'll start to gather! Ruffle it up until the sleeve is the same size as the arm hole.

Pin the sleeve on, right sides together, and sew. I like to double stitch my sleeves, since they tend to get pulled on a lot. Sleeves: good! Collar: not so much. Had to get rid of that t shirty collar.

Collar, meet scissors! I cut right under the original ribbing.

I added binding around the collar, to help it lay more flat. It may look funny in the back...that's because I was literally 1 inch short of binding! I however, am too stubborn to let it fly, so I created one tiny little pleat in the back to make up that extra inch.

See? One little pleat. Nothing fancy, but it did the job! And added a little bit extra interest. Ignore the terrible binding job. My getting way too long hair will hide it.

I also added binding to the bottom! I am lazy and I didn't feel like hemming one single thing. :D

When I thought I was done, I realized that something was missing. I thought about it a little, and then decided to add a bit of shirring right under the bust!

I had never successfully executed shirring, so this was rather exciting! I followed {this} awesome tutorial to get it right. I loved it, I can't wait to use this technique again!


Professional model. I tell ya. 

If this was confusing at all check out {this} t shirt redo I did last winter. It covers everything much more thoroughly. I was a little lazy and didn't go over it as much in depth this time around since it's very similar. 

Linking up {here}
Related Posts Plugin for WordPress, Blogger...