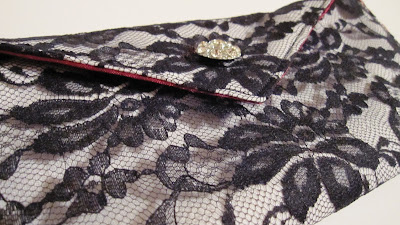
I call her the envelope clutch. Why? Well....
Because this bad boy was my inspiration. I was sending a letter and was thinking about the envelope (because, you know, everyone ponders envelopes) and I thought, "This is the perfect size for a clutch!" And with some fabric, a sewing machine, and about an hour my inspiration became a reality!
It's got dreamy red satin, oh-so-sensual black lace, and one blingly vintage button! Wanna make one too?
You will need:
- Large scrap white cotton fabric (at least 10"x13")
- Large scrap black lace
- Large scrap red satin
- Large scrap medium weight, iron-on interfacing
- Envelope
- Large sheet of paper (bigger than a regular 8 1/2" by 11")
- Closure of your choice (button, velcro, elastic, etc.)
- Iron, ironing board
- Sewing machine, matching thread, scissors, etc...
The first thing you need to do is carefully cut down the sides of your envelope and open it up. This is how you will create your pattern. Lay it on your larger sheet of paper. (I used a sheet of freezer paper, but you can use newspaper, tissue paper, butcher paper, whatever you've got!) Keep the envelope, you'll need it again soon.
Press your envelope down and sketch about 1/4" all the way around the envelope. I chose to keep the bottom straight to make the sewing easier. When you're done, cut out your pattern and fold it in half, lining up the edges. Trim anything that doesn't match up so you're pattern is symmetrical.
Using your pattern, cut out a piece of red satin, black lace, and white cotton. It is not necessary to cut out your fabric with a rotary mat/cutter, I just prefer it that way. Then, using the envelope as a pattern, cut out the interfacing (so that the interfacing is slightly smaller than all the other pieces.)
I didn't take a picture of the next part because you would have puked if you would have seen my nasty ironing board. Following the directions on your interfacing, iron it onto the wrong side of your cotton fabric nicely centered.
You'll now have three pieces: red satin, white cotton with interfacing, and black lace. Pin the wrong side black lace onto the right side of the white cotton (so both of the fabric's right sides are facing up.) Sew the entire way around the black lace using a very small seam (1/8").
Now you have two pieces! The red satin and an interfacing, cotton, and lace sandwich. Pin the two pieces together (right sides together, so the shiny side to the lace side) and using 1/4" seam, sew around your pieces. Leave a 3 inch or so hole at the bottom for turning.
When the sewing is done, clip the corners so when you turn it right side out, the corners will lay flat.
Turn it right side out. Push out the corners (I like to use a chopstick) and make sure they are nice and crisp. Press flat and make sure all your seams and corners are pretty.
Using a very small seam again (1/8"), top stitch along the bottom and along the point at the top ONLY!! Don't top stitch along the sides.
Fold up the bottom of your clutch so that it resembles an envelope. Look back at it if you need to! Pin the sides together and top stitch using that 1/8" seam on both sides.
Now, I'm hugely a little obsessed with buttons, so I used a fantastic vintage button to close my clutch. You can use whatever you'd like, magnetic closures, snaps, velcro, elastic/button, whatever works for you!
When you're done, plan a special date with your honey because this little clutch needs to get out!!
It's the perfect size to hold just the essentials: cell phone, keys, lipgloss, credit card, and maybe something extra!
Make sure you check out my "Parties" tab to see where I'm linking up!


9 comments:
It's adorable! Love it! The diamante button really makes the bag stand out!
You HAVE to stop doing this. I think I've already bookmarked every single tutorial on your blog in my "to do" file. Just stop! (ok, just kidding. Keep the awesomeness coming.)
This is absolutely beautiful! I've been wanting to make something EXACTLY like this and I stumbled upon your post. I can't wait to try this!
Stephanie
This is awesome! So freakin cute :) I must make one...or two... Thanks!
adorable! and, just in time for Valentine's day ;-) thanks for linking this up with my Show and Share party.
Stopping by to let you know that I'm showing you off over at Crafts & Sutch today! I hope you'll come by to take a look around and grab a SUTCH an Inspiration button from the sidebar.
Have a great day!
Erin
I'm in love with this lol...I think that I'll have to make one :). thank you for the tutorial.
dominiquescraftcouture.blogspot.com
I have the perfect material for this! I can't wait to get started! Thanks for the inspiration.
Amazing tutorial! I'm new to sewing and hope to be able to make something this cute one day! I would love for you to link up any of your projects to my Ten Buck Tuesday link parties!
And I'm a new follower :)
www.youngnester.blogspot.com
Post a Comment