Showing posts with label jewelry making 101. Show all posts

11.18.2010

Jewelry Making 101! Part 4- button bracelet

Welcome to our fourth and final installment of jewelry making 101! (part 1- supplies, part 2- basic skills, and part 3- earrings) I hope over the past few days you've enjoyed learning about jewelry making made a few pieces you love! I would LOVE (I mean thrilled to pieces) to see anything you've made using my mini series! (email me: kittycatsandairplanes@gmail.com) Who knows, I might do a featured post of anything you guys have made! :)

Anyway, putting my excitement behind me and moving on to what you're really interested in, the button bracelet! I absolutely love this button bracelet and I'm so excited to walk you through how to make one of your own.

Yeah, I love it. I love the way it clinks and I love how simple yet unique it is. And by your sweet comments you seem to love it too! :) So let's make one!

You will need:
  • A length of chain that will fit around your wrist 
  • Clasp
  • ~ 50 buttons*
  • ~ 50 jump rings*
*The amount of buttons and jump rings entirely depends on you. I put one button on each link of my chain which is a lot of buttons and jump rings! However, I have unnaturally tiny wrists, so my bracelet is pretty small. This amount will vary from bracelet to bracelet, use your best judgment and get a few extra of everything. :)

To get a chain the length of your wrist, simply wrap the chain around your wrist and mark the link with your pliers. Open up the link the same way you would a jump ring and slid the the length you measured out of the rest of the chain.

This is what you should have at this point, a 7 or so inch chain with an open link.

Slid a clasp into the open link and then twist the link back together.

Attach a jump ring to the other end and you've got a bracelet! A very boring one, but a bracelet nonetheless.

Now you can add allll of your buttons!

Open up a jump ring and slid the button through.

Attach the button with the jump ring onto the first link and close it! One down, 49 or so to go....

When you attach your next button, make sure to do it on the opposite side that you did previously, this way the bracelet will look fuller and won't have random spots that look button-less.

It will take a while, but keep adding buttons on each link on opposite sides.

In an hour so so you'll end up with a fabulous button bracelet that you won't want to take off. I've used buttons with holes on the face as well as buttons with shanks and both have worked beautifully for me.

Want to make a matching pair of earrings too?? The process is almost identical and takes a lot less time!

You will need:
  • An inch or so length of chain for each earring
  • A pair or ear wires
  • ~20 jump rings
  • ~20 buttons
Attach a one inch length of chain to an ear wire using pliers.

Using the same method as the button bracelet, open a jump ring, slid a button in and attach it to a link on the chain. Continue all the way up....

And very quickly you'll have a button earring! Repeat the steps to create another one.

Huzzah!!! You've successfully made yourself some fabulous jewelry! Great job, I knew yo could do it. :) I really hope you've enjoyed Jewelry Making 101, and if you have any other questions or would like me to do a tutorial on something else just let me know!!

And be sure to click my "Link Parties" tab to see all the fabulous places I'm linking this up to!
I'm submitting this as my best of 2010!


------------------------------------------------------------------
Did you like any of the jewelry I made? Well...if you did, and you'd like one of the exact same pieces I've made you can go to my brand newly opened Esty shop and purchase anything you've seen me make there!!!!

That's right!!! It's open and has some beautiful pieces listed there. Head on over and help me make my first sale!

11.17.2010

Jewelry Making 101! Part 3- earrings

I hope everyone has been enjoying Jewelry Making 101 so far!! (If you missed it, check out part one and part two!) Now that you've got all your supplies and know the two basic skills, you are ready to make your first piece! Today I'll cover earrings: dangly and studs.

Dangly Earrings
I love me some dangly earrings! I think they add a little bit of fanciness that studs just can't. They are my go-to earrings, I'm almost always sporting a pair of dangly earrings. Wait, you'd like to learn to make some?? Well ok!!

To make these lovely rose pearl drop earrings, you will need:
  • 6 small (6 mm) rose colored glass pearls
  • 4 spacer beads (the silver ones)
  • 2 two inch head pins
  • 2 ear wires
  • Round nose pliers, needle nose pliers, and wire cutters

First, string your beads onto your head pin. Pearl, spacer, pearl, spacer, pearl for five total beads.

Remember those loops we practiced yesterday?? It's time to put those skills to good use! Make a right angle...

Twist around your round nose pliers until you can't twist anymore.

Snip off extra wire with your wire cutters.

Slip an ear wire into your loop.

Close it up! Repeat the steps and in no time and all....

You've got spectacular, date night worthy earrings! They also make excellent gifts for any jewelry wearer on your list! You can use this "loop" concept to make sooo many different varieties of earrings. Your mind will start to race with ideas and you won't be able to stop!!


I used eye pins instead of head pins for the feather and maple leaves ones!

Studs
Studs are so ridiculously easy they barely warrant a tutorial. But, because tutorials are fun, I'll write one anyway. :)

To make studs, you will need:
  • Glue gun
  • Earring posts and "butterfly nuts"
  • Flat backed embellishments (buttons work GREAT for this!! Just get some fancy buttons with shanks and then use a button shank remover or wire cutters to remove the shank.)

Take your earring post and dab a dot of hot glue on it.

And quickly add your embellishment before the glue dries. That's it!!! (Well, after you do it for the other one that's it.) Sooo incredibly easy! I hope you try out both of these methods to create something spectacular for yourself or someone you love.

Come back tomorrow for the fourth and final day of Jewelry Making 101! We'll be making a fabulous, stylish, and pretty freaking awesome button bracelet with matching earrings. Stay tuned!!!

11.16.2010

Jewelry Making 101! Part 2- basic skills

Welcome to part two of a four part jewelry making mini series! Make sure to check out part one which goes over basic tools and supplies for jewelry making.

Today we are going to cover the two basic skills for jewelry making. Yes, two. Just knowing these two skills will open up a world and pretty things for you. The first is opening jump rings, the second is making a loop. The second is much more difficult than the first, but after a few practice rounds you'll notice that you get better and better each time. Let's start with jump rings.

Opening jump rings
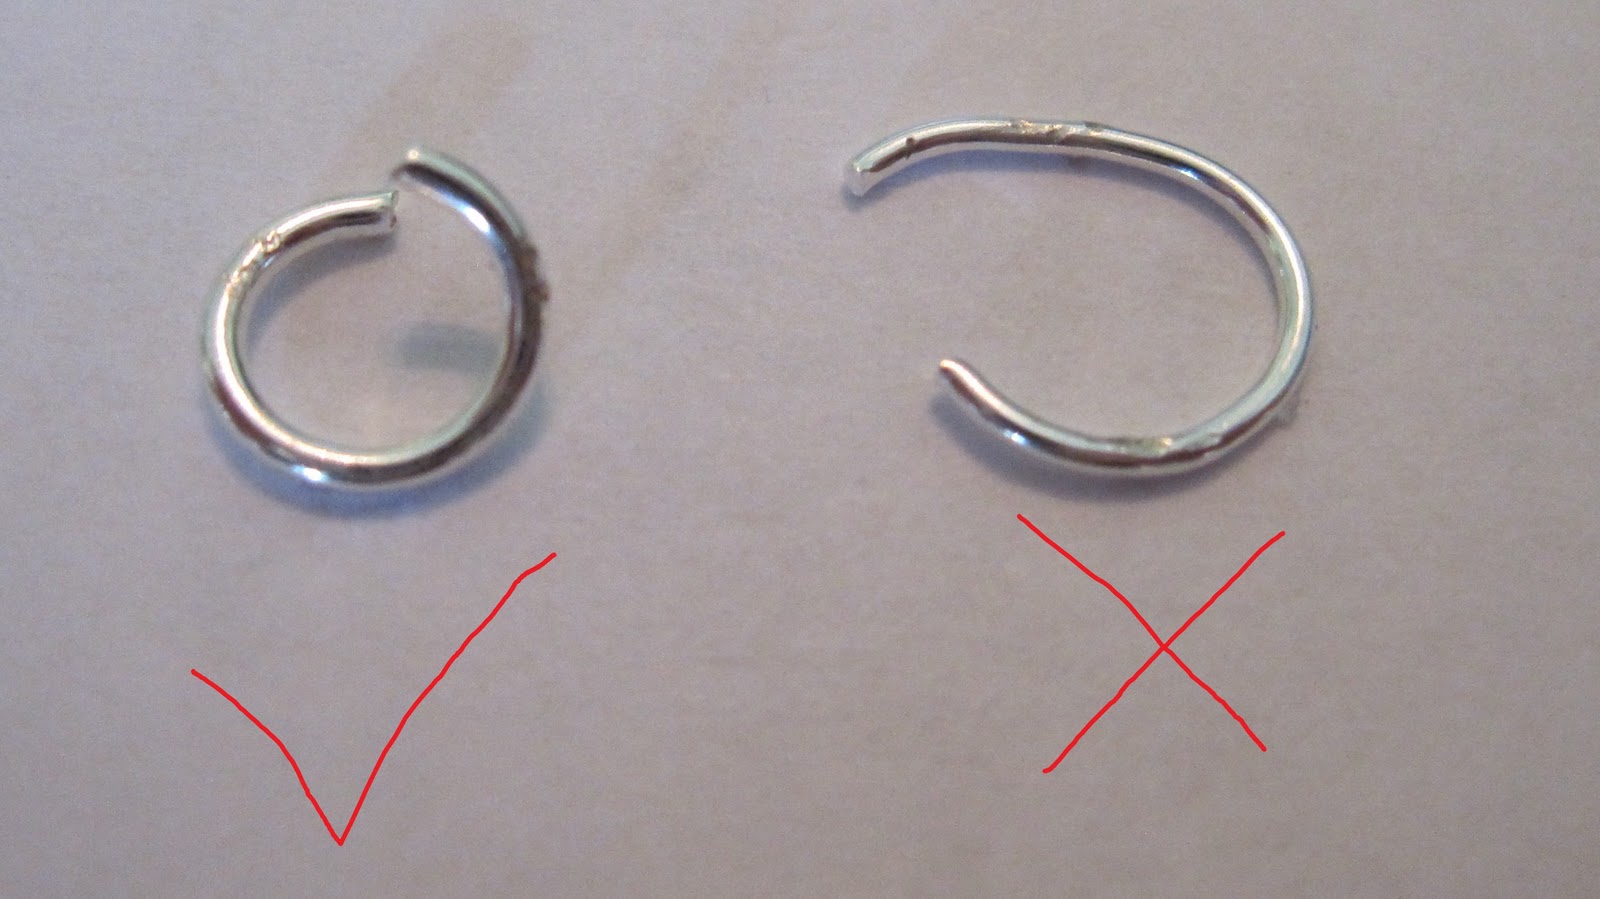
You may think opening a jump ring would be easy, just pull it apart. WRONG! You should never, ever "pull apart" a jump ring. It will distort it and make it look funny. Instead, you must twist it open!

Hold the jump ring securely in your round nose pliers. (Don't squeeze too hard, or you will mar the metal. Marred metal = ugly metal.) It's best to use your fingers whenever possible when making jewelry, because metal pliers will mar metal findings. Remember, marred metal = ugly metal. So if you can gently twist it apart, great! If not, use your needle nose pliers to help you.

Gently twist open the jump ring. It should look like this, nicely twisted open.

On the left is the correct way to open a jump ring. On the right is the wrong way. Twist, don't pull! (See all the marring of the jump rings? I tried to enlarge the pictures so you could see the ugliness of it. Don't work the metal too roughly, use as gentle of a touch as you can.) To close the jump ring, simply twist back together. Easy peasy!

Creating a loop
Creating a loop isn't quite so easy peasy. It takes some practice to learn the metal and figure everything out, and it will be a while before you can create smooth, circular loops like on these eye pins. But never fear! Practice makes perfect.

Remember, use your fingers as often as you can when working with metal. Before you even get started, string any beads you want on the eye (or head) pin. I chose to just have a single tan colored glass pearl for this project. The eye pin I used is way too long but I wanted to show you how much easier it is to work with a longer one when you start out. When you're done stringing your beads on, you need to create a right angle with the leftover length of the pin. Hold it in your round nose pliers....

And carefully beeeend the wire over to create a right angle.

Reposition your pliers so that one end is underneath the right angle the the other is on top, as shown above.

This is why round nose pliers are so magical. Carefully bend the wire all the way around the top of your pliers. Make sure its nice and fitted over the pliers so you'll get a nice loop. Keep bending until you can't bend it anymore.

Keep bending! You'll end up with something that looks like a fish hook with a lot of extra wire.

This is what it looked like after all of my bending. Pretty funny huh?

Cut off the excess wire with your wire cutters, make sure to line up where you cut with where the loop starts. You want an O shape, not a C shape.

Still looks a bit funny. In this one I didn't quite cut enough, so after I took the picture I snipped off about a half a millimeter more.

Use your round nose pliers to pinch the bottom of the loop in place (use the very tips of of pliers if it's a tight squeeze.)

And you are done!! I left mine just slightly open so I could slip in an ear wire to create...

These lovely maple leaf earrings. Keep practicing your loops! Tomorrow we will put them to good use making a lovely pair of earrings for a night out!
Related Posts Plugin for WordPress, Blogger...