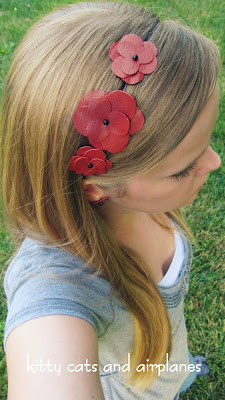
This one has actually been on my to-do list for a while now. A couple months my dad called me up and asked if I wanted some old leather seat covers from my grandfather's old chair. He passed away a few years ago and my grandma moved out of their condo recently, so my dad was helping clean it out. I gladly took the covers and have been meaning to make a red leather flower headband ever since.
To make one, you will need:
- Leather (mine's from an old chair, but I'm sure that vinyl or faux leather from the home dec section of your fabric store will do nicely)
- Stretchy headband
- Embroidery scissors
- Matching thread
- Heavy duty needle
- Beads for center of the flower
- Paper/ pen for pattern making
- Nail (not pictured)
First you need to make your pattern. Make sure it very precise, using exact measurements, rulers, math, and all that fancy stuff. Or scribble on piece of paper you found in the trash. Same diff.
Make one small, one medium, and one large.
Cut out a bunch of flowers in all different sizes from your leather using your small scissors. I ended up not using two of the small ones, so I had two large, five medium, and two small flowers for my headband.
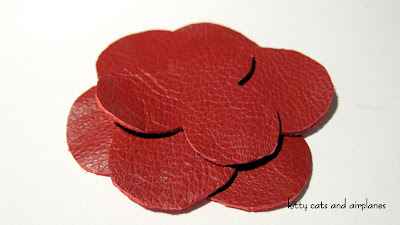
For each flower you need two larger pattern pieces and one smaller one. For example, I used two medium and one small to make one medium sized flower. For a large flower, use two large and one medium. Make sense?
Stack the two large ones on top of each other going in opposite directions, like so.
Stack the smaller one on top, going in the same direction as the first one. It makes more sense when you look at the picture.
Once you've got them all stacked nicely poke holes in the center with a nail (or seam ripper...except don't do that like I did because it probably dulls the seam ripper) where your needle will need to go through. Chances are even your heavy duty needle can't poke through three layers of leather, so it's best to save yourself the trouble and make holes first. Sew the bead on for the center.
And sew your flowers onto your headband! You could also glue them on with hot glue and felt. Whichever you prefer. One thing I should point out: since it is a stretchy headband expect your flowers to be father apart from each other when you are wearing it. So if you want them to stay clustered on your head, make sure to overlap them when you are sewing them on.
Then slap that baby on and get ready for waves of compliments!
Love it! Still four more, come back tomorrow! Linking up {here}
Here is another variation, with only one flower with three layers decreasing in size. I made this one with my mom using a CRAFT CUTTER. Not my Silhouette though, don't try this with a Silhouette or Cricut because that will probably ruin it. This one is modeled by my adorable baby sister. Just as a heads up, she is only 15 and therefore cannot date any of your brothers. Call me again in a year and I will accept applications.
Keep working on YOUR headband creations, there will be a linky this weekend!


7 comments:
Awesome. Too bad guys can't wear headbands. And Allie has a better tan then you. Boo-ya.
Ohhh I LOVE this one! I think it is absolutely my fave from this week soo far.. Can't wait to see what else you have created!
Very cute!
BTW.. I was sooo inspired by your headband making that I shared one I made for my daughter on a blog that I contribute on.. hope you check it out here.. http://www.thetshirtdiaries.com/2011/08/scrap-fabric-to-fabric-flower-headband.html?utm_source=feedburner&utm_medium=feed&utm_campaign=Feed%3A+thetshirtdiaries%2FKcxQ+%28The+T-Shirt+Diaries%29
i really love headband week! and I really love this headband! Im going to go rummage thru my old purses and see if there are any I want to cut up and us the leather for a cute headband!! Sharing on facebook :)
Oooh I might have to try making some leather flowers myself. Thanks for sharing!
I love all of your hairband posts! They are cute, fun, and look easy to attempt!
I'd love for you to link up to our "Crafts for Under Twenty-Somethings" Thursdays this week! It's a blog hop specifically for kids and teens ideas, so your ideas would be perfect! My husband is a youth minister, so I know alot of teen girls who would love these ideas! I'll hope you'll come link up this Thursday. bearrabbitbear.blogspot.com
Melanie
Post a Comment