Showing posts with label freezer paper. Show all posts

5.20.2011

Paint chip note cards {a tutorial!}

I totally meant to get this up yesterday, but I wasn't able to touch my computer for 36 hours. I was dyyyyyyyying!! But it's all good now, and now you get a fun little tutorial!

Fun little note cards! Embellished with paint chips. I have a small stash of paint chips left from other projects and when I found a little circle hole punch on clearance at Michael's I knew what I wanted to do! I didn't know it was take three months to get there...but I did it. :)

I like to think of it as "real" card making, since unless you are a really awesome cardmaker like my former roommate {Brielle}, you don't have fun stamps, embossers, paper, and other little card thingys lying around to make a really beautiful card. Not only are they cute, they're super easy to make! You will need:
  • Paint chips, whatever color you want
  • Circle hole punch
  • Pencil
  • Ruler
  • Paper cutter (optional, but nice!)
  • Scissors (if you don't have a paper cutter)
  • Letter stamps
  • Ink
  • Cardstock (it's white and under all the other stuff, I sweat it's there!)
  • Glue 

First, take the hole punch to the paint chips to get colorful, fun little circles.

Cut out some cardstock to create the card. Fold it in half and create a very nice crease with the side of the ruler.

Glue on those little circles to your hearts. I'm a huge sucker for gray and yellow, so that's what I experimented with first.

Then, using the stamps and ink pad, add any message you want to the front.

And just like that, you've got yourself a personalized, handmade card to use! You can whip out a ton of these very quickly, make them for invitations, thank you cards, thinking of you cards, whatever! Add a few new hold punches to the mix and your possibilities are nearly endless!

I had a lot of fun mixing colors, textures, and creating one folds and no fold cards. I've even tested a few of them out!

What did I write in this I love you card?

A little note to the hubs for while I'm away in NY this weekend. :)

Click my "link parties" tab to see where I link up!

3.01.2011

Tutorial Tuesday- Paint Chip Wall Art

I just LOVE practically free crafts, don't you? Paint chips have got to be one of the most perfect resources for creating free crafts. And dang, some people can do amazing things with paint chips!

Like this! Hot dang this is cool! {This is by artist Peter Combe, click here for the original post} I wouldn't classify today's craft as "seriously amazing" or "cool" but I would classify it as "doable" and "fun." And totally free for me!

March is teasing me with the thought of spring, so I felt the need to liven up the space in the dark and dungeon-like basement I live it. I haven't decided where to put it yet, but it still makes me smile when I walk past it. To make one, you will need:

  • Various colors of Behr paint chips (at least three of each color)
  • Large canvas
  • Paints (I used acrylic)
  • Paint brushes
  • Glue gun (not pictured)
  • A decisive mind
 My original idea was a kind of springy background with clouds and grass. So I painted the canvas a light blue...

Painted some white clouds.

And painted some grass. Took a good look at it and thought it looked STUPID. I HATED it. So I painted over it.

This time I went with purples and blues. Still hated it. Wasn't what I was looking for.

By then the paint was really building it up, so I scraped it all off.

And stared and stared, trying to be inspired. Thought this looked kinda cool, but decided against it.

I finally settled on a combo of whites and yellows and greens. That's springy right? This whole process took a painfully long time, which is why I suggest bringing a decisive mind to the table for this one!

To make the colorful tulips, I took three Behr paint chips and fanned them out to create a tulip looking shape. Then using my trusty glue gun, I glued them on the canvas. It looks way better in real life, I couldn't get the lighting right so the pale colors just look washed out. But I love it, I love the colors, I love the festive springyness of it. I can't wait to see it on my wall, I just need to decide where to put it!

Happy crafting! Don't forget to see where I link up and parrrtay!

11.29.2010

Free Christmas printable

Well, everyone else is doing it! So I decided to jump on the bandwagon and make my own free Christmas printable! I however, spun it around a bit, because let's face it: at this time of year there aren't a lot of people "keeping calm." :)

Right click to save and then print it out and stick it in a frame to make me the happiest girl in the world! Hope you enjoy my humorous printable. :) Come back tomorrow for my first Christmas craft!

And don't forget to link up any of your Handmade Holiday Gift Ideas to my link party!

9.19.2010

Freezer Paper Stenciling

Arrr, it be National Talk Like a Pirate Day!! I hope ye be takin' advantage of this here holiday! :) I considered writing this entire tutorial in pirate, but then I decided against it. It would be a little too hard to read wouldn't it?

I hope everyone is enjoying their Sunday! I got to spend the weekend at my parent's house watching chick flicks, visiting art museums in D.C., eating my favorite foods and watching Big Bang Theory! This will make a little more sense in a little bit. On with the tutorial!

Freezer paper stenciling is a lot of fun and super easy to do! I can think of so many more things I'm going to do with this simple technique! To get started, you will need...

  • Freezer paper (this can be found in large grocery stores by the aluminum foil and wax paper)
  • Article of clothing to be stenciled
  • Stencil (an image of what you want on your clothes)
  • Pencil for tracing
  • Bleach or fabric paint
  • Scissors
  • Craft knife
  • Iron/ironing board
  • Thick piece of cardboard
I created this image in Word using word art and shapes for my stencil. I then traced it onto a large piece freezer paper on the paper side. The waxy side is what's going to be ironed onto your clothes so make sure you're tracing on the paper side!

The hardest part is just cutting out the stencil (this is where the craft knife comes in very handy!)

Once I got my letters cut out, I cut out the "negative" of the starburst.

Stencil cut out!

Using a DRY iron (no steam, no starch, no nothing!) pre-iron your fabric.

Then, still using a dry iron on medium heat, gently iron your stencil on, waxy side down. If it doesn't adhere easily, slowly increase heat until it does. Smooth out any wrinkles and make sure all edges of your stencil are iron on. Don't burn your paper!

Since I had a bunch of letters to iron on, I used my stencil to see where they all needed to go.

I re-ironed my stencil to make sure it was nice and stuck.

I stuck my thick piece of cardboard inside my shirt so the bleach wouldn't bleed through and ruin my creation! You can also use fabric paint for this, just follow the directions on the bottle.

I sprayed away with my water/bleach bottle. This will slightly unstick the stencil, so make sure if you're using bleach you're working on a flat surface.

Wait and wait and wait...and it will start to change!

Get really impatient and blow dry your shirt.

When it's fully dry, carefully peel off your stencil. If you're using fabric paint, don't let it dry fully, just let it set, otherwise it will stick and be a pain to remove.

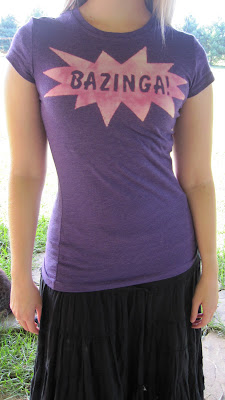
And show off your totally personalized shirt! I love how the bleach made it slightly pink and little white! I was going to touch it up with a little bit of fabric paint, but I thought it turned out great!

What does this have to do with The Big Bang Theory? Well, my favorite character, Sheldon, says "bazinga." So what better way to dress up for a marathon of BBT? :) BAZINGA!!

I hope you try out this technique, it's super easy and such a great way to personalize your clothes to make them more you! And make sure to check out my "link parties" tab to see where I'm linking this up!


Related Posts Plugin for WordPress, Blogger...