Showing posts with label elastic. Show all posts

12.14.2011

Vintage style ring

As promised with your little teaser yesterday, the tutorial for the beautiful vintage style ring! It is so easy, you'll want to make a million of them. Not to mention they are adjustable, and take less than five minutes. Is that enough persuasion for you?

And they are so dang cute!! Eeps!! Ok, you will need:


  • Old hair tie
  • Vintage pin (or a regular pin, or a button)
  • Hot glue gun
  • Ribbon

Yeah, that's it. And you've probably already got all of it.

Measure it around your finger, you'll want it to be a teensy bit smaller than your finger so it will fit snugly. 

Cut it (oops, forgot yo mention you needed scissors, sorry). 

Hot glue the ends together. Cut a small piece of ribbon and heat seal it. 

And glue the ribbon around the raw edge of your ring. 

Pin that little pin on over the ribbon. The thickness of the band and the ribbon should keep everything nicely in place. If you have a button sew or glue it on. 

And slap the sucker on! Five minute cocktail ring anyone?

This is my serious model face. Obviously I've perfected it over the years!

But in all honesty, pay attention to that ring. That blingy little sucker deserves the attention. Not my lack of eyebrows. It's one of the major downfalls of being naturally blonde...your eyebrows are naturally blonde and they kind of disappear into your face. One time, when I was a wee youngin, I was in the grocery store with my mom and suddenly shouted:

True story. No, it really is a true story. And to think they've actually gotten a teensy bit darker since then.

Come back tomorrow for the last bit of "formal" jewelry! Hope you are liking the series so far. :)

10.10.2011

Shirred t shirt makeover

THANK YOU to everyone who has offered to guest post! Thanks to you, I'll be able to have my entire week filled with posts AND still get everything done I need to. Huzzah! Look for some amazing guest posts this week. Seriously, there are some wickedly talented ladies out there.

You might remember that I was in quite the funk just a little bit ago. I had lost my mojo and was so blah for few weeks. My friend {Crystal} helped get me out of it with a challenge to makeover a t shirt! This was such a fun challenge! I was so excited to coordinate with Crystal on this! It really helped spark my creativity, it helped me get my mojo back!


I love how it turned out! Flared waist, flared sleeves, shirring, pleats, color contrast, yay! I was inspired by the colors of fall, I can't wait for it to get a little cooler!

I also model part time. True story! Ok...not a true story. You wanna make one? You will need:

  • T shirt a size or two larger than what you normally wear
  • Scissors 
  • Disappearing ink pen, mark be gone pen
  • Rotary cutter/mat (not necessary, but will be helpful when cutting hems off!)
  • Extra wide bias tape, four yards. I used a three yard pack and I was one inch short! (NOTE: ribbing would have probably been better here, but I didn't have any)
  • Elastic thread
  • Ball point needle for sewing with knits
  • Sewing stuff: machine, matching thread, extra needles, all that stuff. 

And just as a note, I used 1/2" seams for this whole project unless otherwise noted.
Start with a t shirt a size or two larger than the size you wear to give you a little wiggle room and more fabric to work with.This is just a plain old brown t shirt from Jo-ann, got it on sale! (Still on sale, you can buy it {here})


Take that shirt that fits and turn it right side out. Shove the sleeves in and lay it directly centered on your t shirt. Using a fabric marking pen, trace around your shirt with a 5/8ish inch or so for seam allowance. I decided to flare out the bottom of the shirt, and make it a little more flowy.

Cut it out! Fold it in half before cutting to ensure that both sides are even. (It's much more flared I just couldn't get it all in the picture)

Pin and sew up the sides (right sides together!) using a zig zag stitch so the fabric can still stretch. Don't sew through the arm holes, unless you want to go for the straight jacket type look.

Next, sleeves. I used the original sleeve because I wanted it to flare out slightly too. To make it fit, I ruffled it a bit. To do this, run the sleeve through the sewing machine using the longest straight stitch possible and 1/4" seam allowance, leaving long threads. Then, gently pull the bobbin thread, and it'll start to gather! Ruffle it up until the sleeve is the same size as the arm hole.

Pin the sleeve on, right sides together, and sew. I like to double stitch my sleeves, since they tend to get pulled on a lot. Sleeves: good! Collar: not so much. Had to get rid of that t shirty collar.

Collar, meet scissors! I cut right under the original ribbing.

I added binding around the collar, to help it lay more flat. It may look funny in the back...that's because I was literally 1 inch short of binding! I however, am too stubborn to let it fly, so I created one tiny little pleat in the back to make up that extra inch.

See? One little pleat. Nothing fancy, but it did the job! And added a little bit extra interest. Ignore the terrible binding job. My getting way too long hair will hide it.

I also added binding to the bottom! I am lazy and I didn't feel like hemming one single thing. :D

When I thought I was done, I realized that something was missing. I thought about it a little, and then decided to add a bit of shirring right under the bust!

I had never successfully executed shirring, so this was rather exciting! I followed {this} awesome tutorial to get it right. I loved it, I can't wait to use this technique again!


Professional model. I tell ya. 

If this was confusing at all check out {this} t shirt redo I did last winter. It covers everything much more thoroughly. I was a little lazy and didn't go over it as much in depth this time around since it's very similar. 

Linking up {here}

10.03.2011

Epic Upcycle

This was the easiest skirt I've ever made. Probably the prettiest too.

I know, looks super duper complicated right?

One cut. One stitch. That's it. Took me like 10 minutes.

"No way Amie, that is like the prettiest skirt ever! (insert gushing and oohing and ahhing) You must be lying!"

Nope. I'm not. How is it possible to make a skirt with all these lovely ruffles with only one cut and one stitch?

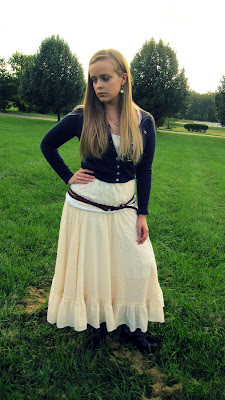
It used to be a tablecloth. A vintage one. (This is my serious face.)


Just like this one. Got it at an antique shop in South Carolina. Best six bucks I ever spent. I actually thought it was a skirt when I saw it across the room. So it was pretty much love at first sight.

(This is my flirty face.) I used Dana's circle skirt tutorial {find it here} Since the tablecloth was already a circle, and hemmed, and ruffled, all I had to do was figure out the measurements and sew the elastic on. I made it a teensy bit too big, because I didn't trust the measurements. "My fat butt cannot POSSIBLY fit through that hole!! (cuts it 1/2 inch more)." So ladies, if you do follow the tute, just trust Dana. She knows what she's doing.

I want to make a million more of these. So comfy, and gosh dang, SO FUN to spin in!!

Just watch out for bugs. They fly in your ears. And your eyes.

I found a similar tablecloth online if you don't feel like scouring antique shops for the perfect vintage tablecloth to wear. {Buy it here} Or you could always buy a few yards of cream eyelet, make a circle skirt, and sew a big ol' ruffle around the bottom.

Linking up {here}

8.11.2011

Headband Week- The big bow headband

First off, I must admit that this wasn't my idea at all. When LMM posted her {headband challenge} she included some headband inspiration. There were some cute headbands, but THIS.

This. This one from {much love illy} I LOVED. A backwards headband! (Though it doesn't really look like a headband...ah yes. I dug around a little bit and it is in fact a {hair clip} from her Etsy shop) I loved the idea and borrowed it to make my own headband.

Loooove it! I scaled mine down a bit so it would be a little more subtle. And it's felt, I love me some felt because I am lazy and don't like finishing edges.

I made it in pretty much the exact same way I made the {lace bow}, but we'll go over it again since that was like more than six months ago.

You will need:
  • Elastic headband
  • Scissors
  • Felt
  • Glue gun
  • Ruler, maybe. I didn't use one. I hate measuring. 

Cut a strip of felt out. I think this was like 3 inches wide and 8 inches long? Maybe nine? I hate measuring. I just cut and go. Anyway, glue the ends together to make a loop.

Squirt a little dab of glue in the center of your loop, on the non glued side. Be quick!

Fold the loop over the little dab of glue. This will create that little pleat in the middle of the bow.

See how the middle is all nice and glued? Awesome. Fold back the non glued part and...

Cover with another strip of felt. So easy! I think this strip was 1 inch bye 4 inches? Maybe? I should have made it a little thinner.

Glue onto your headband. Make sure that the bow is going on the same direction as the headband, otherwise when you put it on it will look funny.

And slap that baby on. I feel like this headband is kind of like a mullet, except it's sporty in the front and cute in the back. I love how you can still see a bit of the bow poking out! I think this would be so adorable with super short cropped hair. Someone should cut off all their hair, make this, take a picture, and send it to me. Because I am way too scared to chop off all my hair.

Linking up {here}

What headband projects have YOU been working on? I can't wait to see them!

8.10.2011

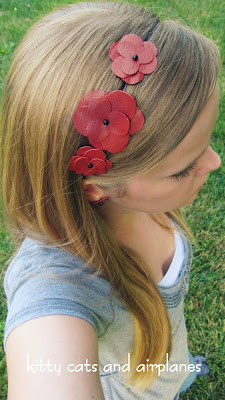
Headband Week- Red Leather Flower Headband

This is my favorite headband from the whole week! It is simple, sleek, and pretty all at the same time. It was one of the more complicated ones, and by that it mean it took 20 minutes to make instead of 5.

This one has actually been on my to-do list for a while now. A couple months my dad called me up and asked if I wanted some old leather seat covers from my grandfather's old chair. He passed away a few years ago and my grandma moved out of their condo recently, so my dad was helping clean it out. I gladly took the covers and have been meaning to make a red leather flower headband ever since.

To make one, you will need:

  • Leather (mine's from an old chair, but I'm sure that vinyl or faux leather from the home dec section of your fabric store will do nicely)
  • Stretchy headband
  • Embroidery scissors
  • Matching thread
  • Heavy duty needle
  • Beads for center of the flower
  • Paper/ pen for pattern making
  • Nail (not pictured)


First you need to make your pattern. Make sure it very precise, using exact measurements, rulers, math, and all that fancy stuff. Or scribble on piece of paper you found in the trash. Same diff.

Make one small, one medium, and one large.

Cut out a bunch of flowers in all different sizes from your leather using your small scissors. I ended up not using two of the small ones, so I had two large, five medium, and two small flowers for my headband.

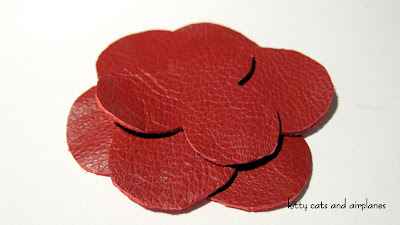
For each flower you need two larger pattern pieces and one smaller one. For example, I used two medium and one small to make one medium sized flower. For a large flower, use two large and one medium. Make sense?

Stack the two large ones on top of each other going in opposite directions, like so.

Stack the smaller one on top, going in the same direction as the first one. It makes more sense when you look at the picture.

Once you've got them all stacked nicely poke holes in the center with a nail (or seam ripper...except don't do that like I did because it probably dulls the seam ripper) where your needle will need to go through. Chances are even your heavy duty needle can't poke through three layers of leather, so it's best to save yourself the trouble and make holes first. Sew the bead on for the center.

And sew your flowers onto your headband! You could also glue them on with hot glue and felt. Whichever you prefer. One thing I should point out: since it is a stretchy headband expect your flowers to be father apart from each other when you are wearing it. So if you want them to stay clustered on your head, make sure to overlap them when you are sewing them on.

Then slap that baby on and get ready for waves of compliments!

Love it! Still four more, come back tomorrow! Linking up {here}


Here is another variation, with only one flower with three layers decreasing in size. I made this one with my mom using a CRAFT CUTTER. Not my Silhouette though, don't try this with a Silhouette or Cricut because that will probably ruin it. This one is modeled by my adorable baby sister. Just as a heads up, she is only 15 and therefore cannot date any of your brothers. Call me again in a year and I will accept applications.

Keep working on YOUR headband creations, there will be a linky this weekend!
Related Posts Plugin for WordPress, Blogger...