Sorry to be such a downer, I just haven't been very motivated the last few days to come up with something crafty. Instead, I'm reposting my tutorial I did for my blog swap with Mine for the Making. Enjoy.
Trick or treating is just around the corner and your kiddos are going to need something cute to hold those mountains of candy in! This one is fast, easy, and completely customizable to your child's liking!
To make one, you'll need:
- Two pieces orange felt
- Scraps of black and cream colored felt
- Scissors
- Disappearing ink pen
- Embroidery scissors (optional, but very helpful!)
- Liquid stitch (again, optional, but very helpful)
- Regular sewing notions: machine, coordinating thread, seam ripper, etc.
The first thing we need to do is round the top. Fold the felt in half (hot dog style) and round the corners to your liking. Mine was more oval shaped at the top rather than just rounded corners.
Once you've got a shape you like, trace that shape onto the other piece of felt and cut that out too.
To make the handles, fold the felt in half again and cut out an oval shape as seen above. Do this for both sheets.
Now it's time to embellish your bag! I wanted a spooky full moon with a bat flying by. If that's not your thing you could add a cute ghost, a witch on a broom, a jack-o-lantern, whatever you'd like! To make the moon a traced a large mug on some cream felt and cut it out. Then, I cut a bat out of some black felt (I used embroidery scissors here.)
I arranged them in a way I liked and liquid stitched them right on. You could sew them on too, I just took the easy way out. :) Wait for it to dry before trying to sew with it, otherwise you'll want to pull your hair out.
Pin around the sides and bottom of your tote (right sides together.)
Using 1/4 inch seam, stitch around the sides and bottom. (I used black thread because I thought it would be more festive that way, and it's easier for you to see!)
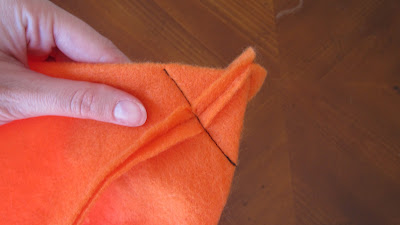
Next, we're going to "box" the bottom to make it more tote-like. Take one of the corners at the bottom and pinch in the opposite direction of the seam, as seen above. Pull on the sides to make sure it's completely flat.
Make sure the two seams line up (just feel around until it lines up.)
Mark with a pin about an inch away from the corner.
And stitch across the bottom. Trim off the excess triangle, turn it inside out aaaand....
You've got yourself a customized trick or treat tote! If you've got time, I think this would look fantastic with some blanket stitching around the handles or with your child's name embroidered onto it! The possibilities are endless!


1 comment:
Hey Amie- I toatlly get what you are feeling. I too lost one of my besties a few years ago and still have a hard time with it. I have even called the cell pphone number I had for him..(crazy I know). I'm to hear about your loss. Chin up my dear...it will get better...craft a robot for him. :o)
Post a Comment