{Anyone read memebase?}
And well, I had to try!
And I succeeded! Win! Now, this tutorial goes over the very basics of a wallet. Slots for cards, slots for cash. But the cool thing is, this wallet is REALLY customizable! You can add a coin purse section, you can add a fun closure, more pockets, go crazy!
So for a glue gun wallet, you will need:
- Felt (I used two sheets of the same kind of felt, not the white pictured)
- Glue gun
- Ruler
- Scissors
- Marking tool (the sharpie)
- Embellishments (the lace in the picture, I ended up not using any because of the detail of the felt)
- Wallet for measurements
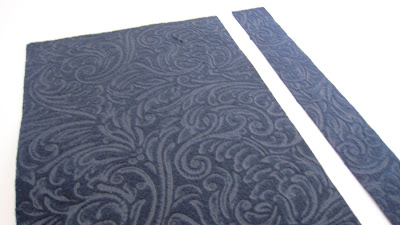
Isn't this felt so cool? It's embossed with a cool paisley pattern!
I used my wallet to gauge measurements. First I cut the sheet to 7 1/2 inches wide.
Then I cut it down to a little less than 8 inches tall. Don't throw any of these scraps away!
I used the leftover scrap to cut two strips 7 1/2 inches wide and a little less than 2 inches tall. Then I cut a third piece from a new piece of felt. So now you have three 7 1/2 x 2ish inches pieces. Fold your original 7 1/2 x 8ish in half to see where the middle is. Then arrange your strips on one side like so. There's no measuring here, just make it look even.
The measuring was just to make sure it lined up nicely. Take the strips off the wallet and squirt a thin line of glue along the bottom of your fist strip. This strip goes at the TOP. Line it up nicely, press it down.
Do it again for the second one, overlapping the first one. Like so. Repeat for the third strip.
See how they're all overlapping nicely? Glue down the sides.
Cut two strips from your new piece of felt 3 inches by 7 1/2 inches for your cash slots. Remember that fun overlapping gluing fun-ness you just did? Do it again for your cash pockets! You should end up with an almost wallet like this!
To divide the credit card slots, I just put a credit card in, pushed it all the way to the side, and marked the middle. Then I added a tiny dot of glue right at that point between the two layers and did the same for all three layers. You don't need more than a little dot!
See how the pockets are now divided? Now you can add more credit cards!
Fill it up with all your goodies! Embellish it, customize it, make it your own! I decided to not add any embellishments because I didn't want to cover up the fun texture of the felt.
Wasn't that so easy? No sewing and a half our? My kind of project.
Don't forget to see where I link up! I'm back to partying!


13 comments:
I love that you made it using only hot glue! Awesome!
PS - and I love the 'Assignment Accepted' image - made me chuckle :)
WOW! What a creative idea :) Thank you for sharing and for stopping by my blog! I am your newest follower and I look forward to your future blog posts :)
http://sweetenedbykagi.blogspot.com/
Girl! You've got some talent with that glue gun! So awesome!!! =)
Loving your blog! =)
xoXOxo
Jenn @ Peas & Crayons
i just bought the same felt a couple weeks ago!! so funny :)
love that you used your glue gun (you should totally email this post to kimbo)
turned out so nice!
that would be so cute to make a smaller version for my little nephews. They are all lucky enough to be getting Sunday allowances. I'll have to find some cute Hero Character felt.
no need to send it to me! I'm here...you had me at glue gun.
adore! A wallet after my own heart!!!
That felt you used is great! First time I've seen something like it. Great idea to use glue gun (sewing takes so much time! haha) And thanks for visiting my blog!
I say be brave! Go for the glue gun! Fear not this was a fun post!
By the way, I have a contest giveaway on my blog you might find fun. Take a look. triumphandtears.blogspot.com
This is a great tutorial! Thanks for sharing!
Great idea! I just had TONNES of fun reading through all your older posts (yes, ALL!) Thanks so much for sharing your creative and tasty ideas!
Found you via Sassy Sites and am now following! :)
I must say, I am impressed. I would have never thought of this, even though I used to be glue gun crazy!
Found you on the Hello Friend Blog Hop and am now following you. I'd love it if you would follow me at Dropped Stitches.
that is really cool... I would try this... :)
We are having a linky party if you would like to join... http://www.bubblynaturecreations.com/2011/02/project-party-weekend-springtime.html
that wallet is cool! glue guns sure are magic aren't they? thanks for linking this up with my Show and Share linky party.
Post a Comment