(Get it? Like "racy" pearl necklace because it's so HAWT? ....ok never mind.)
In case you missed me over at Crystal's Craft Spot, here is the project I posted over there!
------------------------------------------------
As probably already know, my current crafty kick is jewelry. I love perusing through websites and finding inspiration for my own jewelry. That's how I ended up here today. I know you've seen knock offs from Anthropologie, J. Crew and other fancy sites, but my piece today actually came from
Old Navy!
I love it! I love the ribbon strung through the chain, the feminine flower, pearls and black satin, what's not to love? The $15 price tag doesn't exactly make me cringe, but why shell out money when I can make my own with things I already have?
Ah yes, I very much like my version. Would you like to make one too? This is one of the easiest pieces I've made so far, it didn't require any fancy jewelry making tools or skills. If you can sew, you can make this!
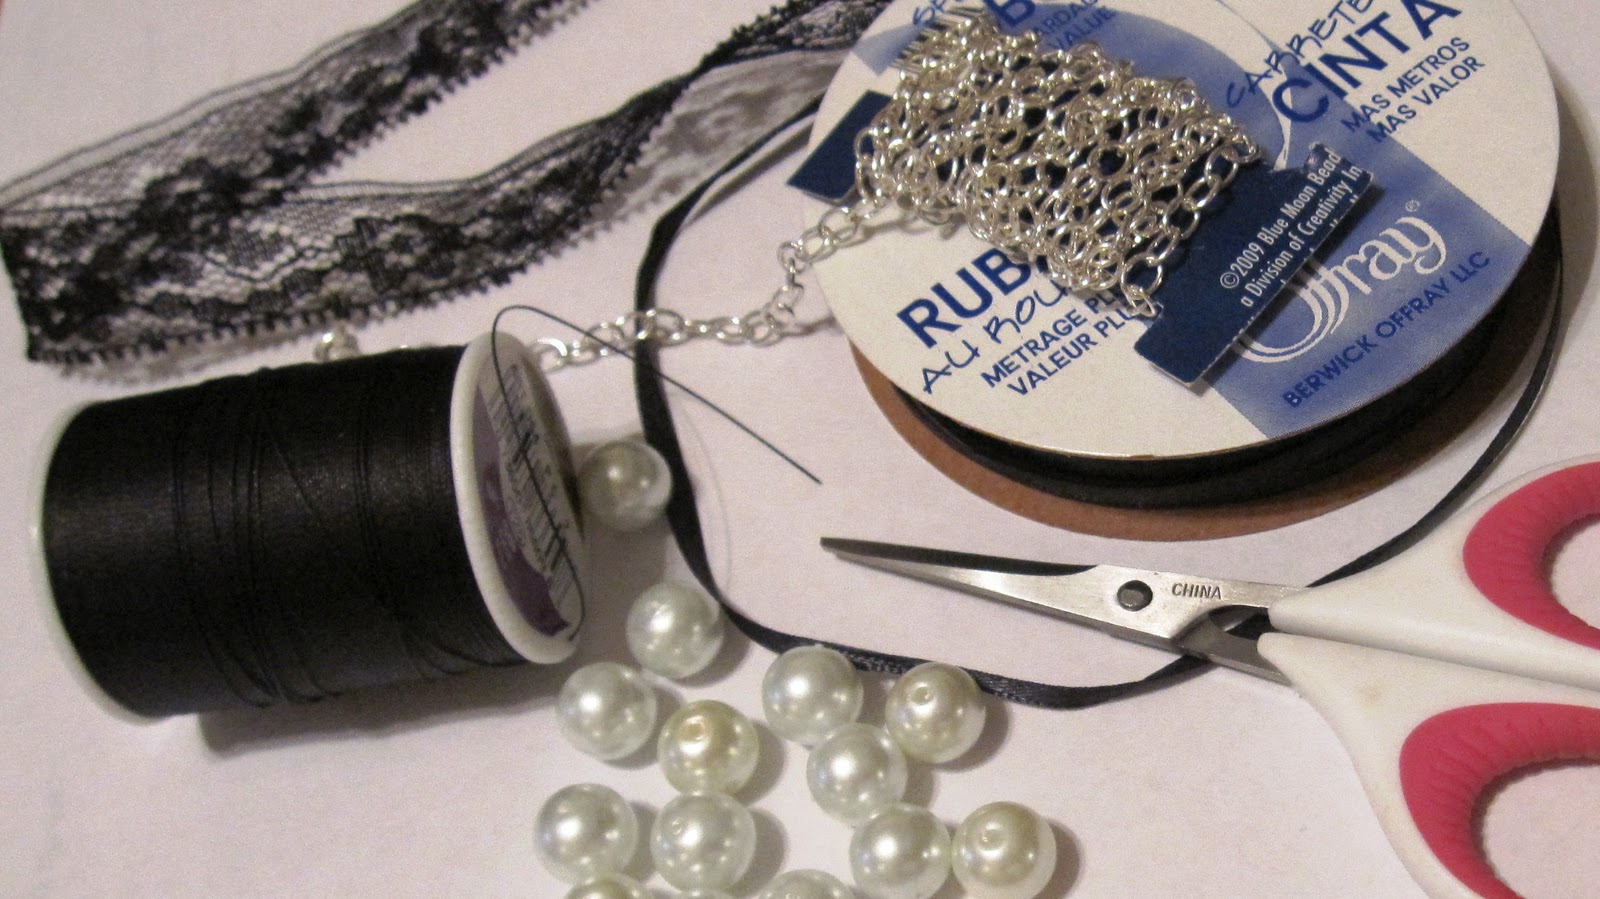
You will need:
- Thin, black, satin ribbon
- Black lace (I ended up using black lace from the bolt, not trim like pictured above)
- Strong black thread and needle (I used upholstery thread)
- Medium sized silver chain and two large jump rings
- Large faux pearls (8mm)
- Scissors
- Heat source for heat sealing ribbon (not pictured)
- Clear nail polish (not pictured)
- Needle nose pliers (not pictured)
This necklace has three parts to it. The first thing to do is to thread the thin ribbon through your chain. I took a 12 inch length of chain and a 30 inch length of ribbon. I used tape to create a "needle" on the end of the ribbon to make it easier to thread.
This is the most time consuming part of the necklace. Simply thread the ribbon through every other link in the chain just like you were sewing.
Wanna know a secret to make it easier? Tape it all down! Hold the chain taut with one hand and do the threading with the other hand. When I figured this out it went infinitely faster! Done with the first part. Two more to go!
Next, thread a length of strong black thread through your needle. We're going to make the fancy pearl section of the necklace!
Cut two lengths of black ribbon (I didn't do any measuring here, but they should be at least a foot long, if not more) and heat seal the ends. Thread them onto your needle and then add a large glass pearl.
This part is a little tricky to explain so I'm going to keep my fingers crossed that the picture tells it better than I will. Take one of your ribbons and wrap it around one side of the pearl. Use the needle to thread the strong thread through the ribbon and secure it in place. Do the same thing with the other ribbon on the other side of pearl. You should end up with a ribbon encased pearl. String another pearl on and wrap it with ribbon again, and continue until you have a strand of six pearls. Don't cut anything after this!!!
The third part is the flower. I decided to use black lace because I kind of love lace. To make this particular flower, cut out several flower shapes out of lace. This does NOT have to be perfect, just fold the fabric several times, cut out a flower shape through all the layers and you'll end up with a handful in one easy step!
Take one flower and fold it in half twice. There is no rhyme or reason to this, no need to try and line everything up, just fold it so there is a point. Thread another piece of strong thread through your needle and then thread your folded flower onto it. Do this for all your flowers, and then carefully fan them out into a circle. If you find that your flower is thin and not full enough, cut out some more flowers and just add them. Keep fanning and fluffing the folded flowers until you have a shape you like.
This makes your flower very three dimensional! I added a tiny faux pearl to mine and knotted the whole thing off. Now we're ready to assemble the necklace!
Thread a large jump ring through (that has been TWISTED, not pulled open with needle nose pliers) the chain AND ribbon. Just ease the ribbon through, it should easily be done. Once the chain and ribbon are threaded on, add the flower. I just used the thread on the back of mine. Then, thread on your little pearl length through (leave the ribbons and thread free). It's a lot to add to one little jump ring, but it should all fit just fine! Close the jump ring by twisting it back.
Amazing what one little jump ring can do! Position the three pieces so that the pearl length and it's ribbons and threads are up and the threaded chain is down.
Remember how you left those ribbons and threads? This is so you can tie your necklace off! Tie a knot very close to the pearls.
Once knotted, you can cut off the threads and ONE of the ribbons. Don't cut the other one off or you won't be able to wear your necklace!
On the other side of your necklace (the one with only the chain and ribbon) string another large jump ring through the chain AND the ribbon. Then, string a shorter length of ribbon and through tie a tiny little bow there.
Isn't it cuuuuute? Use the clear nail polish to seal the knot.
Remember how you cut off one of the ribbons earlier? Take it and tie it onto the jump ring with the bow to finish off your necklace!! Go back and heat seal any raw edges and use the clear nail polish on any knots you've created. And you're done!
Admire your handiwork because you, my friend, just made one fantastic necklace. To wear it, simply tie the ribbons behind your neck!
Did I mention I'm giving away this exact necklace? Click
here to enter to win! (It's pretty low entry, so your chances are high!)
Oh yeah...and don't forget to see all the fabulous blogs I party at! Click my "parties" tab to see them all, and maybe even find a few more that you didn't know about!


14 comments:
sooo pretty, thanks for the tutorial. I'll have to get some lace so I can make one.
you made this!? this is beautiful. love it!
Oh wow!! You did a super fabulous job! Thanks for sharing on how you made that lace flower ... I am totally lovin' it!
Love it!
I'm a new follower.
Amy's Life @
www.amyclairejacob.blogspot.com
Cute! Cute! Cute! You made the tutorial so easy too! Thanks.
This is such a fun piece! Trendy yet sophisticated! Love it! Thanks so much for stopping by the RLM! So happy you did because now I can check out all your fabulousness!
Adorable!! This would be so cute in so many different colors! That black is super chic! love it!
I'm a new follower to! Yay! Love your blog name too:)
www.poppiesandpoetry.blogspot.com
i love the idea, its so my style. How cute!
Thanks.
Joanne
jpineda77@hotmail.com
This is gorgeous, thanks for sharing the idea!! I'm going to try it as soon as I get some more ribbon. :)
http://holtgrsl.blogspot.com/
I love it!.. and lucky me I get to wear it! Can't wait to share how it looks.. Thanks for sharing with the Pink Hippo Party!
Some really awesome stuff on your blog :'D New Follower!
The necklace is very chic.. now I want it.
http://www.pearlnecklaceshop.com/
Hi Amie, Have you ever thought about makeing dog and cat collars? Not for leashes,but for bling. I think you could sell a number of them. Pet Shoppers Palace
nice and so informative
Pearl Jewelry Pearl Pearl Jewelry Set
Post a Comment