I've got another great guest poster today! I "met" Julie a few months ago when she sent me a picture of a button bracelet she made from one of my tutorials. I was tickled pink! You may have seen me over there a few weeks ago. She's got a fantastic tutorial for you today!
---------------------------------------------------------------------------
Thank you so much to Amie for having me over to gues post here at Kittycats and Airplanes!! You just start to feel a little like you've "made it" when someone asks you to guest post on their blog...
Moving on...
I am Julie from Vibrant Designs. I began sewing about 3 1/2 years ago while I was on bedrest during my second pregnancy. My first project was a large and small diaper bag for the new baby. Then, the following Christmas I made a purse for my sister. Really, it was just a hobby until some family members suggested I sell my creations....then friends began asking me to make them diaper bags. So, Vibrant Designs was born the summer of 2009, when I began writing this blog and making bags with an actual price tag to sell. I opened up my etsy shop this past September where you will find bags of all types, hair accessories, and jewelry.
I've recently begun writing a couple of series on my blog that I am really enjoying!
*features tutorials and projects to keep your little ones busy during long road trips*
*features tutorials and projects to help you...well...organize your life*
And some of my favorite posts like...


Today, I'm going to share with you one of my Touring Tuesday Tutorials with you. I had decided that some finger puppets would make a good addition to our road trip bag o surprises so I did some research and got nada...at least for little people finger puppets that is.
I would like you to meet...
Ally
and Kaitlyn...
These are the names my little girl gave her new finger puppets!! I love it!
Meet Ally and Kaitlyn: a Finger Puppet Tutorial
Materials:Felt scraps (white or cream, 2 other colors for the dress, yellow/black/brown for hair)
Scissors
Glue gun
Floss
Pattern GET PATTERN HERE!
Step 1:
Using the cream/white felt…
Lay your pattern on the fold and cut 2 pattern pieces.
Using the 2 other felt colors for the dresses…
Using one of the pattern pieces you just cut as a guide, lay it on top of one of the dress colors and cut out your first dress. Do the same with the second dress color to cut out the second dress.
Using the yellow felt…
Cut out the hair pieces by laying the head of one of the cream felt pieces on top of the yellow felt. Cut out a shape the same as the head. Free hand cut the hair to look like this.
Place the two body pieces together...
Handstitch using a running stitch around the edge of the puppet, leaving the bottom open.
Completely stitched...
Handstitch eyes and a mouth through both layers. If you so desire, you can do this step before you stitch the body pieces together. This is just an added step that I didn't think was needful.
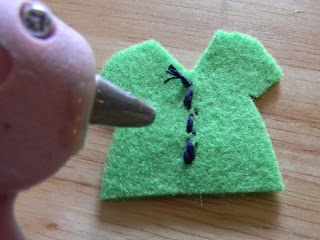
I chose a solid green felt so I decided to stitch buttons down the front. Notice I did not do this on the pink/white polka dot felt.
Attach your shirts to the body...one on one side, and one on the other.
Let's attach the hair to one side...beginning with the crown of the head, dab a small amount of hot glue and attach to the head.
Snag one of the pigtails...put another dab of glue...and attach pigtail.
Repeat process with second pigtail...then place your "bows" over the seams of where the pigtails and the crown meet.
Repeat the steps to attach the hair on the other side.
Put in a little baggy and wait until your next road trip...hand it out as a little surprise, or...
let the little one with the skinny fingers give her a try right now :) It wouldn't take much to make this pattern into a boy...just straighten the sides of the dress a bit...make them boy colors and get rid of the pig tails.
PS. We do know a Kaitlyn...but I am completely baffled as to where she came up with Ally!
THIS GIVEAWAY IS CLOSED! Thanks for entering!
And because...oh just because, I'd like to GIVEAWAY a $20 shop credit!! Mother's Day is coming up and there are a few bags that would make peRfect Mother's Day gifts!!
Mandatory entries:
Leave a comment telling me what you would choose from my shop :)
Optional and encouraged entreis:
*Be a follower of Kitty Cats and Airplanes
*Be a follower of Vibrant Designs
This Giveaway will run until Saturday, April 30th! We will choose a winner using Random.org. Be sure to leave you email address so we can contact you!
To all Kittycats and Airplanes readers, I would like to extend to you a 15% discount in my shop. It is good for two weeks so be sure to stop over and find something you like!
Discount Code
KCA15
Happy Good Friday!! 3 more days till Resurrection Day!!
---------------------------------------------------------------------------
I LOVE this idea! And she even included the pattern! Isn't Julie fantastic? Make sure to enter the giveaway! I know for a fact that her bags are top notch! Thanks Julie!


11 comments:
i like rana clutch, the pink one :D
i already follow KC&A
following vibrant-designs
nilastiana@gmail.com
i like a the cream little lovely headband
already follow KC&A :D
brand new follower of vibrant-designs
sorry, forgot, my email: gusvian@gmail.com
I love the set of three headbands or the buttercup back. Just couldn't pick one.
I follow Kitty Cats and Airplanes
Love the simple hobo bag in blue! Thanks for the giveaway!
I follow Kitty Cats and Airplanes!
I follow Vibrant-Designs now! Love the bubble wrap bingo!
Post a Comment